Activities
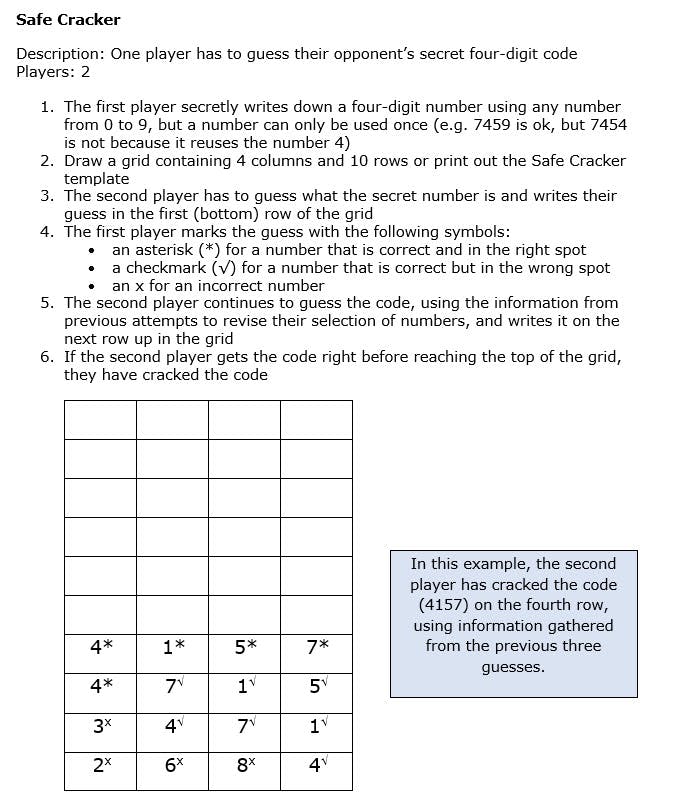
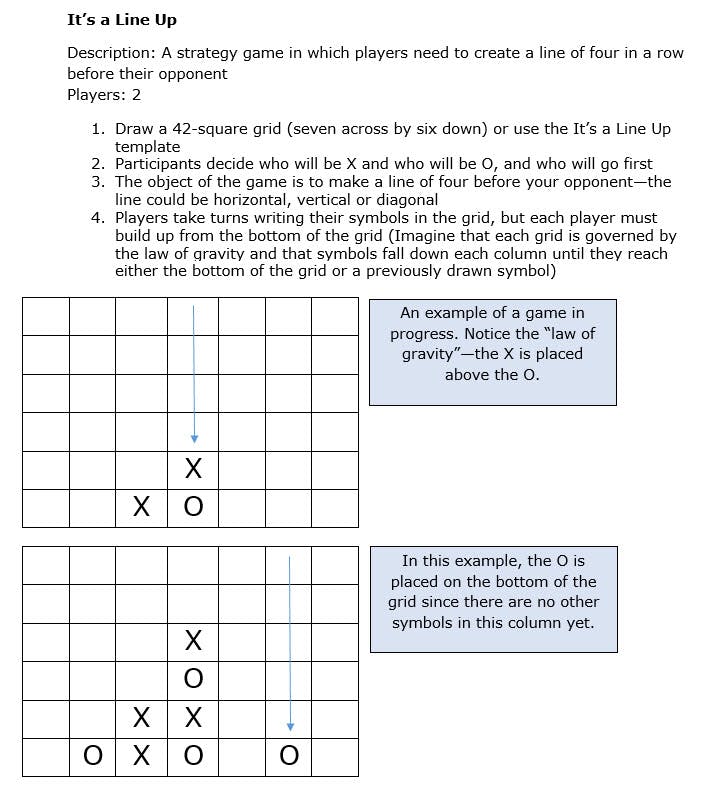
Here are some fun games, activities and crafts to offer at your library. All fit with this summer’s theme.
The full instructions for each activity provide all the details you need to run them, including space considerations, materials lists, preparation steps, and tips to make activities inclusive for kids with varying abilities. It can be helpful to ask if participants have any accessibility accommodations and to include written and visual instructions to make it easier for families to participate. For more tips, visit the Plan for Accessibility page.
There are also passive programming options with ready-to-print templates, as well as programs that can be adapted for outdoor settings.
Visit the Canadian Space Agency website for more activities and free resources in English and French.
Passive Programming Templates
Ages 0-12
5-30 minutes
Passive Programming Templates
You may want to consider sharing our passive programming templates on your online platforms as printable activities.
Catapult Launcher
Ages 9-12
20 minutes
Catapult Launcher
Description
Make your own catapult launcher and shoot basketballs into a basket
Space Considerations
Any type of space where kids can be seated to do a craft and safely test their catapults
Competencies
- Creative and imaginative thinking
- Development of fine motor skills
- Problem solving
- Strategic thinking
Materials
- Pompoms or cotton balls
- Craft sticks
- Plastic spoons
- Masking tape
- Rubber bands (various sizes)
- Paper cup or small bin
- Scissors (adult use only)
Preparation
- For option 1 only: Pre-cut a craft stick—snip 5 cm off each end, using scissors
Implementation
Option 1:
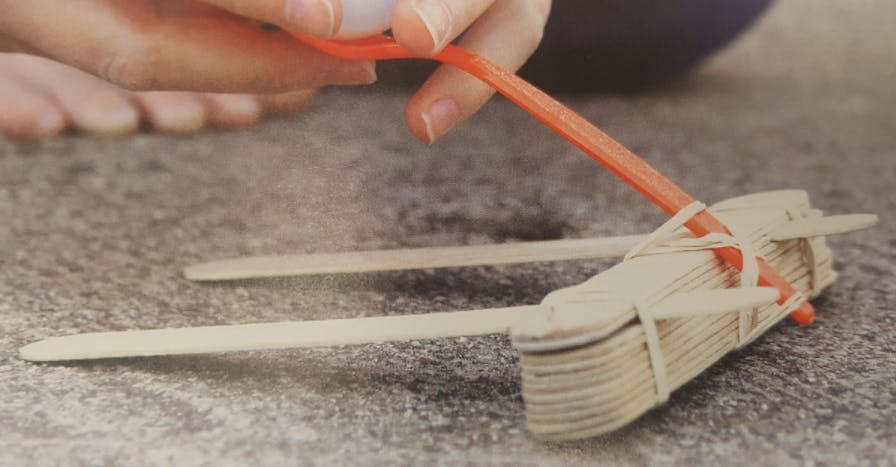
Image taken from 101 Kids Activities That Are the Bestest, Funnest Ever! by Holly Homer and Rachel Miller
- Stack 7 to 8 craft sticks
- Place the pre-cut, shorter craft stick on top of the stack, in the centre
- Add two more full craft sticks on top (The shortened stick will be the third from the top)
- Secure the full bundle of craft sticks with two rubber bands placed about one-third of the way in from each end
- Centre a plastic spoon upright against one side of the craft stick stack, then crisscross a rubber band around the stack on each side of the spoon to keep it in place
- Take another rubber band and loop it so that the top and bottom are around the front of the spoon, above and below the craft stick bundle
- Add two more craft sticks perpendicular to the stack by inserting them into the space on each side of the shortened craft stick
- Add two more rubber bands (one on each end) to keep the perpendicular sticks in place
- Place a paper cup, small bin or a similar target in front of the catapult—if desired, you can also build your own mini basketball hoop
- Test that the catapult works by placing a pompom on the spoon, gently pushing it down and then releasing
- Make modifications as needed
- Now, aim for the cup or target!
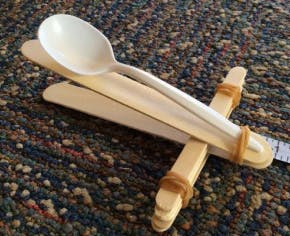
Option 2:
- Use the craft sticks to create a base by stacking 6 to 8 together (known as the large stack)
- Wrap rubber bands on both ends to hold the stack in place
- Separately, stack two craft sticks and place a spoon on top
- Wrap a rubber band around the craft sticks and the bottom of the spoon to secure it in place (known as the launcher)
- Place the centre of the large stack in between the two craft sticks of the launcher
- Optional: Wrap another rubber band where the large stack and spoon cross to hold the catapult together (not pictured)
- Test that the catapult works by placing a pompom on the spoon, gently pushing it down and then releasing
- Make modifications as needed
- Now, aim for the cup or target!
Book Suggestions
Basketballogy by Kevin Sylvester
Extreme Abilities: Amazing Human Feats and the Simple Science Behind Them by Galadriel Watson
Download Links
Coding a Maze

Ages 6-8
30-45 minutes
Coding a Maze
Description
Learn the basics of coding language as you guide a small figurine through a paper maze, and then try out your new coding skills on the computer
Space Considerations
Participants will need access to tables and enough space to spread out the coding printouts. If the computer coding portion of this activity is included, all participants will also need access to a computer or tablet (individually or shared in small groups).
Competencies
- Computer literacy
- Logic and sequencing
- Spatial relationships
- Strategic thinking
Materials
- Paper for printing maze templates
- Paper for printing coding commands
- Characters (figurines similar in size to a LEGO person)
- LEGO or DUPLO (optional)
- Computers or tablets (optional)
Preparation
- Print several copies of the coding commands—about one copy for every two participants
- Separate the coding commands by cutting along the grey lines
- Print out maze templates, one for each participant
Implementation
1. Optional: Participants can add LEGO or DUPLO to the grey parts of the printed mazes
2. Hand out Maze 1
- Introduce the concept of “sequence”:
o Code must be written in a specific order called a sequence
o Just like a story wouldn’t make sense if the sentences were re arranged in the wrong order, code won’t work if it’s written in the wrong sequence
o This applies to the maze and also to coding more generally - For this maze, hand out the following pre-cut coding instructions: Go Forward, Turn Right, Turn Left, End
- Participants need to create a long list of the instructions that they think the character needs to follow to reach the end of the maze
- The character must avoid the grey areas of the maze and only stay on the white squares
- Once participants have organized their list from top (first command) to bottom (final command), place the character at the start of the maze
- Another participant, staff or a caregiver can check the code by moving the character and following the instructions in the list
o Flip over each command as it is completed
o Participants can make corrections as needed—young children often need corrections on left and right turns, as they must think about the turns from the characters’ perspective
3. Hand out Maze 2
- Introduce the concept of “loops”:
o This is when you want to repeat steps in a sequence
o Rather than piecing together three separate “move forward” commands, children can learn to use the code “for the next _ steps, move forward,” filling in the blank space with the amount of steps needed - Hand out the following pre-cut coding instructions: Go Forward, Turn Right, Turn Left, For ___ Steps, End
- Participants need to create a long list of the instructions that they think the character needs to follow to reach the end of the maze
o It’s a good habit to start indenting the line of code underneath the loops—this is required by some computer coding languages, and it also makes the language much more readable - Once participants have organized their list from top (first command) to bottom (final command), place the character at the start of the maze
- Another participant, staff or a caregiver can check the code by moving the character and following the instructions in the list
o Flip over each command as it is completed
o Participants can make corrections as needed
4. Hand out Maze 3 (Note: a more advanced concept; for older children)
- Introduce the concept of “if-then-else” statements:
o These will enable kids to think about writing as short a program as possible
o An if-then-else statement is comparable to answering a true or false question—if the answer is true, a certain action occurs; if the answer is false, another action occurs
o To get their character to walk in a straight line, participants could come up with the following code: “If > there is no wall > in front of me > go forward” - Hand out all of the coding instructions: Go Forward, Turn Right, Turn Left, For ___ Steps, If, Else, Else If, There is a Wall, There is Not a Wall, In Front of Me, To My Left, To My Right, On All Three Sides
- Participants need to create a long list of the instructions that they think the character needs to follow to reach the end of the maze
o There are many possible codes that can be written based on these options
o Allow participants to experiment with the different options and see if they can write a variety of code to get their character to the end of the maze
o There are many ways to get the character from start to finish, so keep on experimenting with different codes - Once participants have organized their list from top (first command) to bottom (final command), place the character at the start of the maze
- Another participant, staff or a caregiver can check the code by moving the character and following the instructions in the list
o Flip over each command as it is completed
o Participants can make corrections as needed
5. If you have access to computers or tablets for the program, or if you would simply like to encourage participants to practice their coding after the program, try out the ten challenges on maze blocky, which is a comparable exercise to the printed maze the kids have just completed
Book Suggestions
Awesome Minds: Video Game Creators by Alejandro Arbona
How to Code a Sandcastle by Josh Funk
I'm a JavaScript Games Maker: The Basics by Max Wainewright
Download Links
Craft Stick Puzzles
Ages3-5
20 minutes
Craft Stick Puzzles
Description
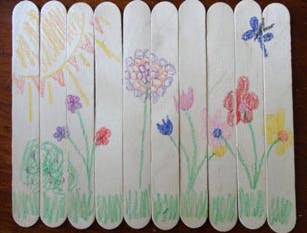
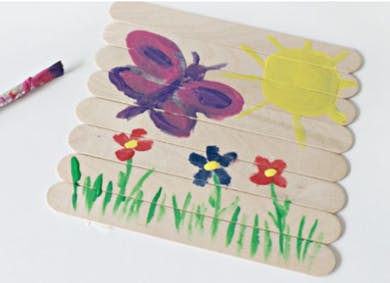
Create your very own puzzle using craft sticks and take on the challenge of piecing it back together
Space Considerations
Any type of space where kids can be seated to do a craft
Competencies
- Artistic expression
- Development of fine motor skills
- Logic and sequencing
Materials
- Large craft sticks or popsicle sticks
- Crayons, pencil crayons or markers
- Masking tape
- Rubber band (optional)
Preparation
- Determine how many craft sticks you are going to distribute per participant (6 to 10 craft sticks is recommended)
- Line up the crafts sticks and place two or three strips of masking tape across the sticks at the top and bottom, ensuring there is no space between the craft sticks:
Implementation
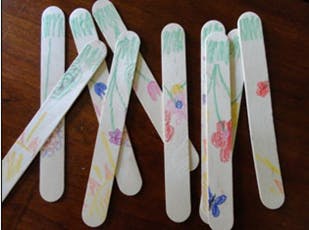
- With the masking tape still attached, distribute the craft stick set to each participant
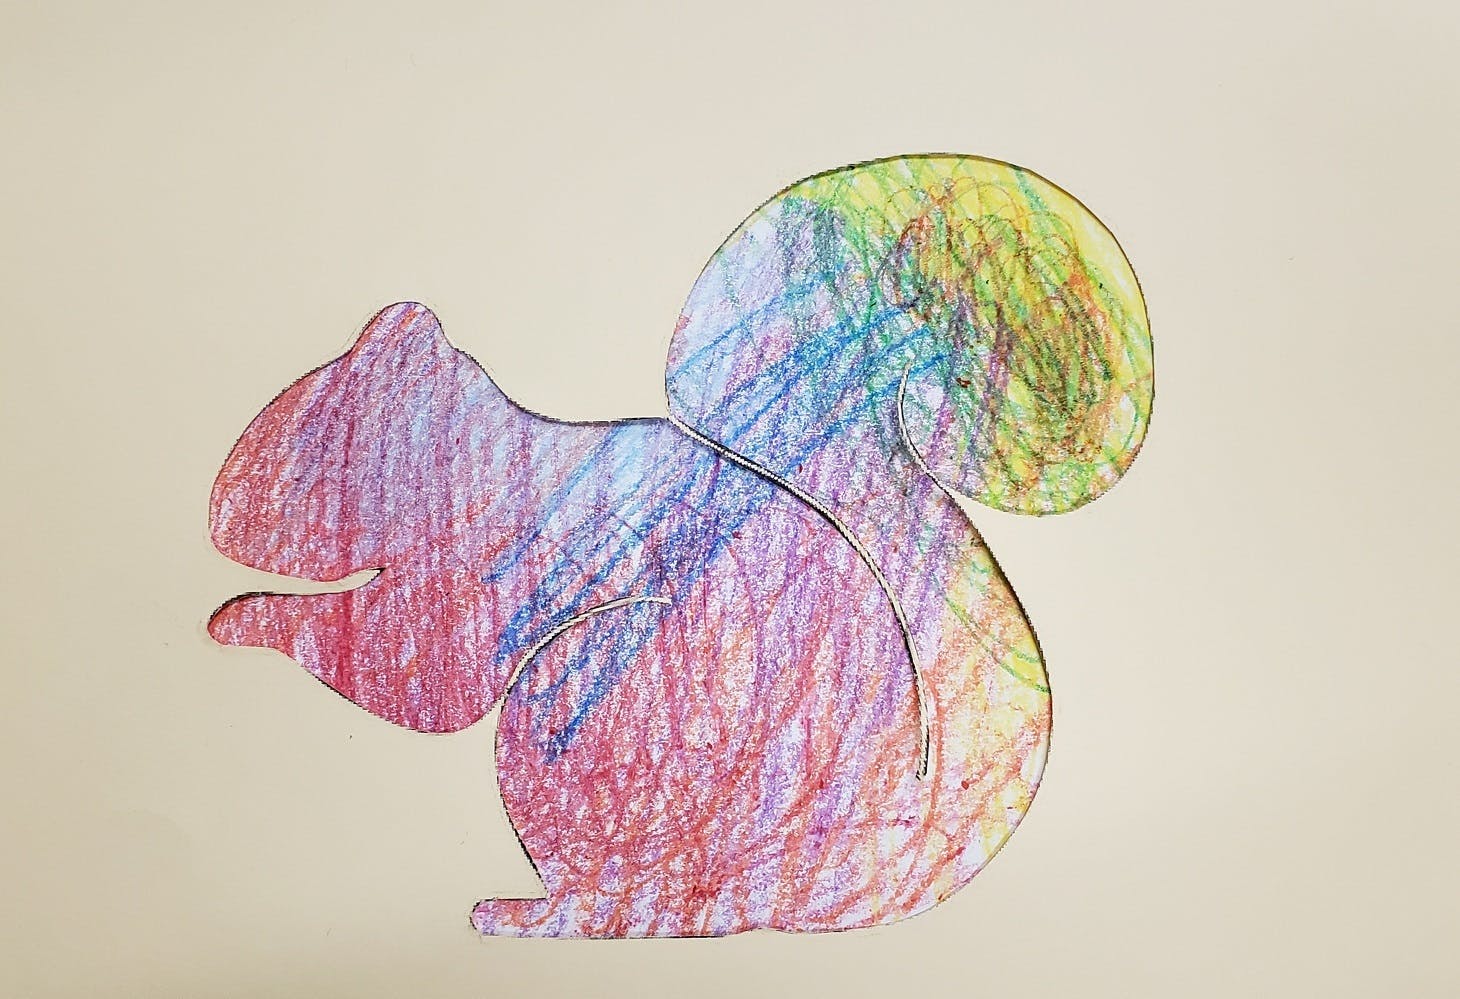
- Participants should draw an image on the non-masking tape side of the craft sticks
- Encourage children to draw a colourful image and fill in all the craft sticks with at least some portion of an image—a craft stick should never be completely empty!
- Once the picture is complete, flip the craft sticks over and remove the masking tape
- Participants shuffle the craft sticks and then try to put the image back together
- To store the puzzle, participants can wrap a rubber band around the craft sticks so they don’t lose any pieces
- If desired, encourage participants in the program to temporarily exchange puzzles with others and attempt to piece them together
Book Suggestions
Frida and Bear Play the Shape Game! by Anthony Browne and Hanne Bartholin
Hide-and-Seek: A First Book of Position Words by R.D. Ornot
In a Minute: Take the 60-Second Challenge! by Claire Lowther
Look and Find Animals by Kirsteen Robson
Download Links
Images and Templates

Ddakji (Ttakji)

Ages 9-12
30-60 minutes
Ddakji (Ttakji)
Description
Ddakji (ttakji) is a traditional South Korean slap match game that originated in Japan and was adopted into Korean culture in the 19th century. Similar to the game Pogs, participants try to flip over each other’s paper tiles, but without a slammer piece.
Number of Participants
For a minimum of 2 participants. Participants can challenge each other or compete in teams.
Space Considerations
When creating a ddakji paper tile:
- Participants can create their ddakji while sitting on the floor or at tables with chairs. If sitting on the floor, participants could use hardcover picture books as a flat surface or just use the floor.
While playing ddakji:
- It is better to play this indoors, as wind could be a factor outside. There should be a space for game play and for participants to watch and wait for their turns.
Competencies
- Development of fine motor skills
- Eye-hand coordination
- Social interaction
- Spatial relationships
- Understanding cause and effect relationships
- Understanding shapes
Materials
- Two paper clips (to hold the paper down)
- Scissors
- White or coloured paper (8.5 x 11)
o Alternatives: Printer paper, newspaper, card stock, thin cardboard, origami paper (15 cm x 15 cm origami paper might be too small, 25 cm x 25 cm/~10 x 10 inches might be better)
Note: If you don’t have two different coloured pieces of paper, draw something on one side to differentiate the two sides once you have completed your paper tile.
Preparation
- Watch this Ddakji video on YouTube so that you can explain the game to the participants.
Implementation
Creating Your Ddakji Paper Tile
Ddakji Paper Tile Instructions
Playing Ddakji
- Decide who throws first by playing one round of Rock Paper Scissors—the winner is the “challenger” and the other player is the “opponent”
- The opponent puts their ddakji on the ground and the challenger slams/slaps their ddakji on the opponent’s, trying to flip it over
- If the challenger does not flip the opponent’s tile, the ddakji’s are left where they are and the players switch roles
- The new challenger picks up their ddakji and slams it into the other player’s tile
- Traditionally, the winner keeps any ddakjis they flip over
Variations:
For 2 or more players:
Each player takes turns trying to flip each other’s ddakji with their own tile
Team play options:
Option 1: One vs. All Tournament Style
- The first player on Team A takes on each Team B player in turn
- If Team A’s first player loses, then the first player on Team B takes on each Team A player in turn
- Keep switching from a player on Team A to one on Team B until someone can flip all of the opposing team’s tiles
Option 2: Team A vs. Team B Individual Matches
- Form two teams of the same size
- Each player plays against one person on the other team
o Team A player one vs Team B player one
o Team A player two vs Team B player two
o etc.
Book Suggestions
Extreme Abilities: Amazing Human Feats and the Simple Science Behind Them by Galadriel Watson
Inuit Games by Thomas Anguti Johnston
Download Links
Images
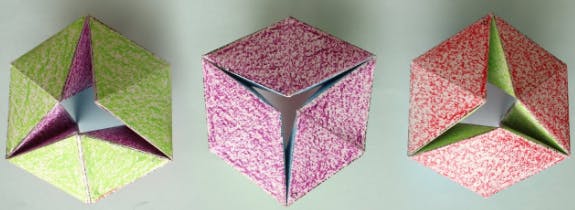
Flextangle
Ages 9-12
20 minutes
Flextangle
Description
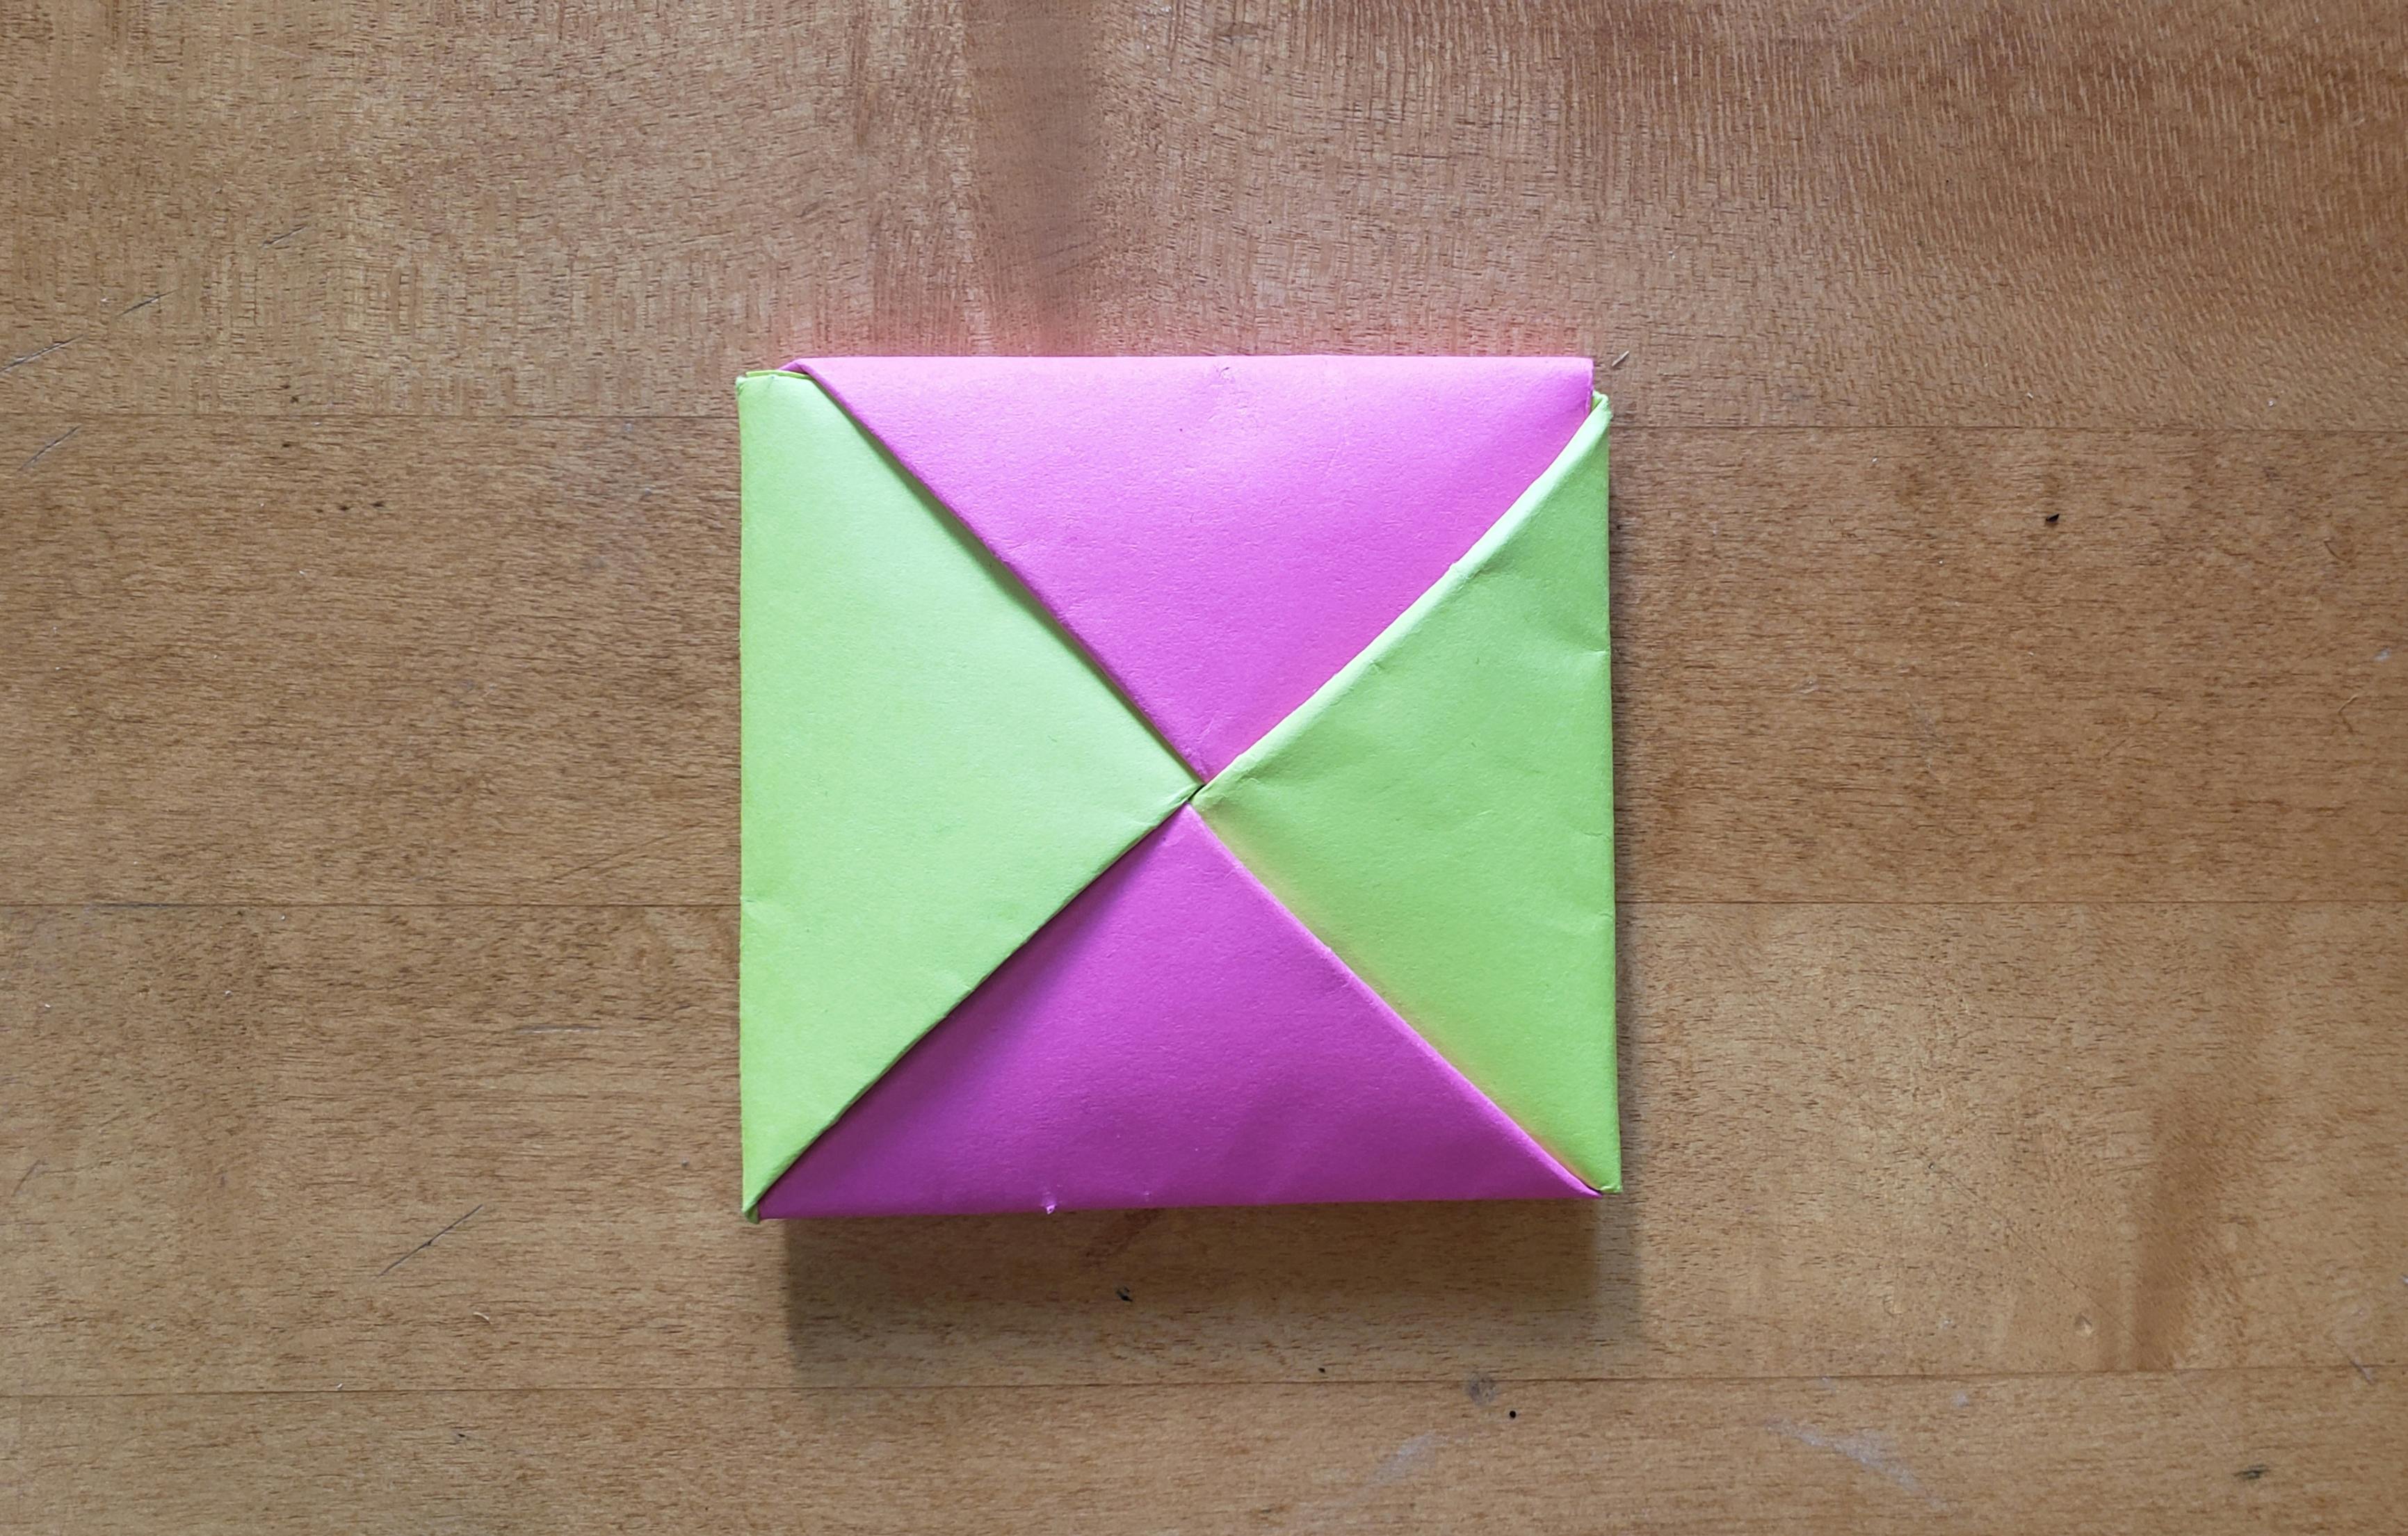
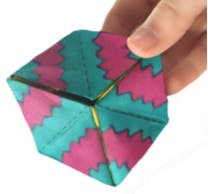
Colour and fold your very own flextangle
Space Considerations
Any type of space where kids can be seated to do a craft
Competencies
- Artistic expression
- Development of fine motor skills
- Logic and sequencing
Materials
- Flextangle templates
- Crayons, pencil crayons or markers
- Scissors
Preparation
- Watch the YouTube video with instructions for making a flextangle in order to guide and assist participants during the program
Implementation
- Distribute the flextangle template to participants
- Participants should colour and draw designs in their flextangles and then follow the numbered instructions
Book Suggestions
The Canadian Kids' Guide to Outdoor Fun by Helaine Becker
Mr. Lemoncello’s Library Olympics by Chris Grabenstein
Download Links
Images
Let's Go Fishing
Ages 0-3
40 minutes
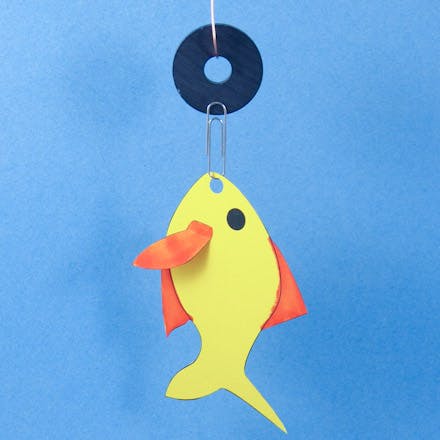
Let's Go Fishing
Description
Make a pond full of paper fish and try to catch them with a magnetic rod
Space Considerations
An indoor space with room for children and their caregivers to do a craft
Competencies
- Artistic expression
- Development of fine motor skills
- Eye-hand coordination
- Sensory motor skills
Materials
- Wooden sticks
- String or yarn
- Small magnets
- Paper or card stock
- Paper clips
- Tape
- Crayons, pencil crayons or markers
- Fish template
- Glue (optional)
- Googly eyes (optional)
- Scissors (adult use only)
Preparation
- Prepare the room for a program that uses glue or paint
- Cut yarn to strips of 2 feet long each, one for each participant
Implementation
For the fishing rod:
1. Wrap the yarn around one end of the wooden stick and tie a knot
2. Tape around the knot to keep the string firmly in place
3. At the other end of the yarn, tie or tape the small magnet in place
For the fish:
4. Children can decorate their fish templates and have caregivers cut them out
5. It is optional for children to glue a googly eye onto their fish
6. Caregivers help children slip a paper clip onto the head of each fish—it’s best to add a small piece of tape over the paper clip to secure it in place
To play:
7. Put all the fish cutouts on the floor (Alternatively, you can place the fish on a large sheet of blue paper to simulate a pond or within a large cardboard box)
8. Show children how to use their magnetized fishing pole to catch a fish from the pond
9. If desired, add a number or letter to each fish for an added literacy component
Book Suggestions
Crash, Splash, or Moo! by Bob Shea
Frida and Bear Play the Shape Game! by Anthony Browne and Hanne Bartholin
Hide-and-Seek: A First Book of Position Words by R.D. Ornot
You Hold Me Up by Monique Gray Smith
Download Links
Images
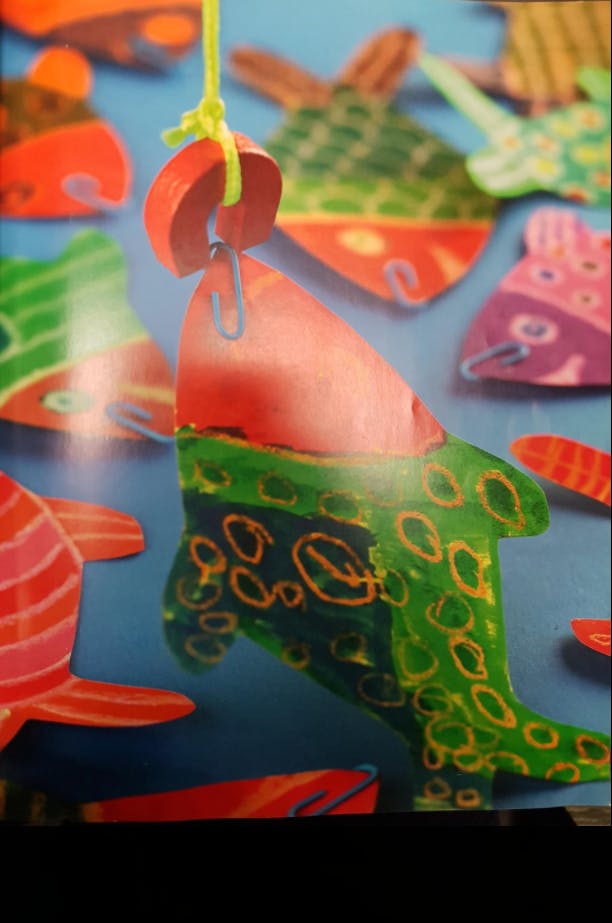
Image from the book Crafts With Kids by Susie Johns
Mini Basketball Hoop
Ages 3-5
15 minutes
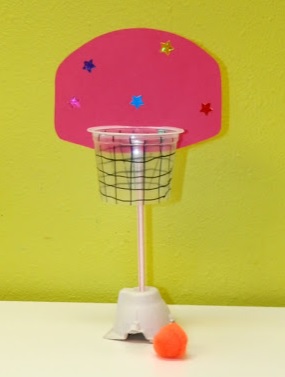
Mini Basketball Hoop
Description
Create a mini basketball hoop and practice your skills as you take shots on the hoop
Space Considerations
Any type of space where kids can be seated to do a craft
Competencies
- Development of fine motor skills
- Eye-hand coordination
- Sensory motor skills
Materials
- Paper cup, empty yogurt or pudding cup, or strip of construction paper (for hoop)
- Card stock, construction paper, cereal box or cardboard box (for backboard)
- Pompoms or scrunched up paper ball (for ball)
- Straws, craft sticks or coffee stir sticks (for pole)
- Playdough or egg carton bottom (for stand)
- Scissors (adult use only)
- Crayons, pencil crayons or markers
- Tape
Preparation
- For hoop:
o If using paper cup, yogurt or pudding cup: Cut a hole in the bottom of the cup (or allow caregiver to cut a hole) that is large enough for a pompom to go through
o If using a strip of paper: Use the hoop template to cut out hoops or allow caregivers to cut out the hoop - For backboard:
o Use the template to trace the backboards on your choice of material and then cut them out - For stand: If using egg cartons for the stand, cut out the individual cups
Implementation
1. Prepare the hoop: Distribute a cup with a pre-cut hole on the bottom or distribute the hoop template
2. If desired, participants can decorate the cup or draw gridlines to resemble the mesh of a net
3. If using a hoop template, participants should tape the ends together to form a circular rim
4. Distribute one backboard to each participant and allow participants to colour and decorate their backboards
5. Participants use tape to affix the hoop near the bottom of their backboard:
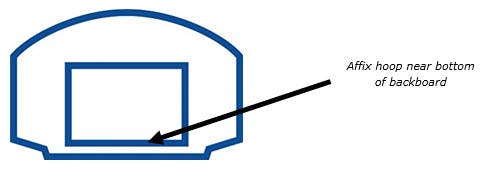
6. Attach the pole (straw, craft stick, coffee stir stick or similar alternative) to the back of the backboard using tape:
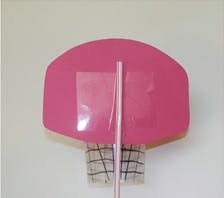
Image from Tippy Toe Crafts
7. Stick the other end of the pole into playdough or push the end through the carton and secure in place using tape:
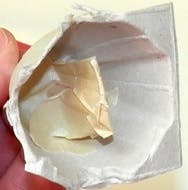
Image from Tippy Toe Crafts
8. Distribute a small pompom (or scrunched up ball of paper or similar alternative) and challenge children to throw the ball into their hoop from a short distance
Book Suggestions
5-Minute Basketball Stories by Sarah Howden
Lucy Tries Basketball by Lisa Bowes
Download Links
Images
Image from Tippy Toe Crafts
Mini Games from Around the World
Ages 9-12
5-15 minutes
Mini Games from Around the World
Description
A selection of mini games from around the world
Space Considerations
Varies depending on the game selected
Competencies
- Oral communication skills
- Problem solving
- Social interaction
- Strategic thinking
Materials
- For Dara
o Paper
o Pencil or pen
oPrinted template (optional)
o 24 game pieces (12 in one colour and 12 in another)—these could be scraps of paper or tokens - For Panchigi:
o Thick paperback textbook, magazine or directory
o Four lightweight coins (e.g. dimes) - For Weme:
o Ball
o Hula Hoop
Preparation
- For Dara:
o Watch the Dara instructional video on YouTube so that you understand the game and can explain it to participants - For Weme:
o Watch the Traditional Indigenous Games: Weme YouTube video so that you understand the game and can explain it to participants
Implementation
Choose one or more of the following games:
Dara (Nigeria)—5–15 minutes
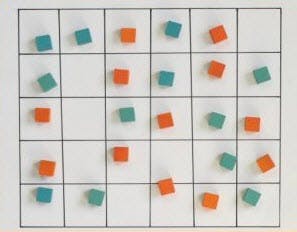
A traditional Nigerian board game for two players that involves a lot of strategy to make three-in-a-row.
- Draw a 30-square grid with 6 columns and 5 rows (the board is empty at the beginning of the game)
- Each player will need twelve coloured pieces (different colours for each player), which can be small scraps of colour paper or any other small object like tokens or coins
- The younger player goes first
- Players take turns placing their squares onto the empty cells of the square board—this is known as the drop phase
- After all 24 objects have been dropped, the move phase begins
- Players take turns moving their piece into an adjacent empty cell—no diagonal movements
- Players attempt to make three-in-a-row with their own pieces
- The three-in-a-row must be horizontal or vertical and it must strictly be three pieces in a row (four or more pieces formed in a row is illegal)
- When three-in-a-row is made by a player, they can remove one enemy piece from the board which is not part of a three-in-a-row itself
- The game ends when one player has only two pieces left—the other player is the winner of the game
Dr. Kwak Kwak (Philippines)/Human Knot—15–20 minutes
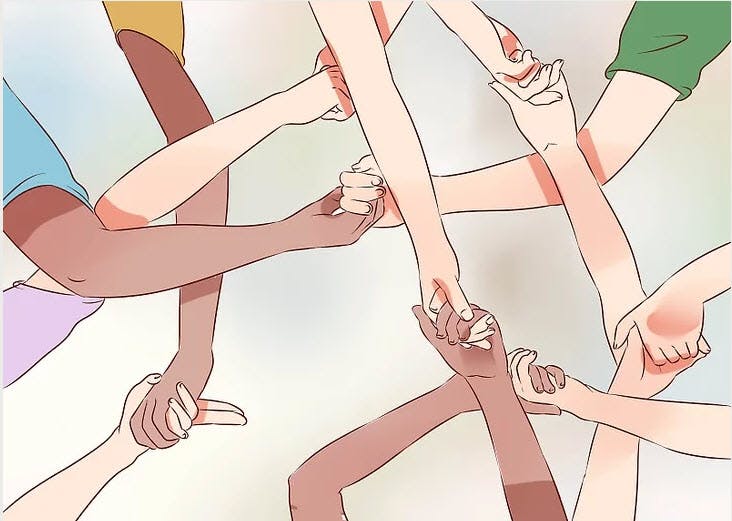
This variation of Dr. Kwak Kwak from the Philippines is also known as Human Knot in other countries. It is a team building game which challenges participants to problem solve.
- One to two people are selected to be “doctors” and leave the room
- The rest of the participants form a circle and hold the hands of the people to the left and right of them
- Form a human knot—kids can walk, twirl each other, step over each other, twist, etc. but cannot let go of each other’s hands until the knot has been fully unravelled
- Once the human knot has been formed, participants yell “Dr. Kwak Kwak please help us!”
- The doctors return and must untangle everyone by instructing them (i.e. walk underneath, step over, etc.)
- When holding other people’s hands, use a loose grip as you will have to move around
Olympic Statues (Greece)—15–20 minutes
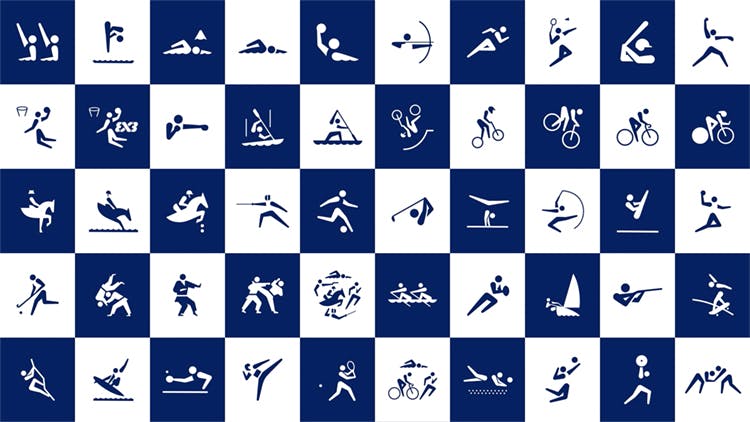
This variation of the Statues game from Greece incorporates sports poses instead of famous statue poses.
- “It” turns away from the rest of the kids and counts aloud to an unspecified number and yells “FREEZE!”
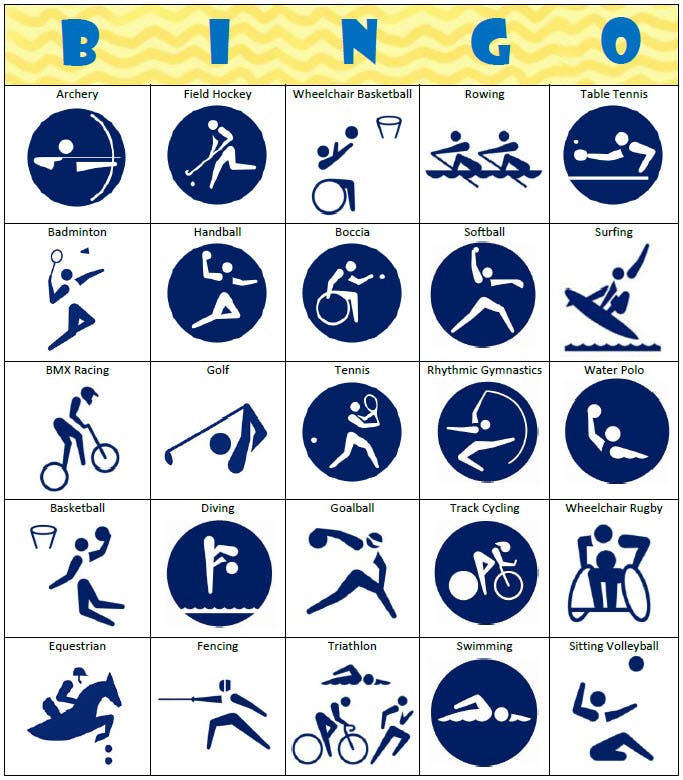
- The rest of the participants must pause in a pose that mimics an Olympic sport (images of Olympic sports can be displayed for kids who might be unfamiliar with the poses)
- Kids can pose individually or with another participant
- “It” walks to each player and tries to make them laugh or move without touching them
- Anyone who moves is “out”
Panchigi (South Korea)—5–15 minutes

A South Korean game in which participants take turns slapping the surface of a book to flip coins over.
- Use a thick paperback textbook, magazine or directory that is worn out and has space between the pages when it is laid flat
- Put four lightweight coins (e.g. dimes) on top
- The object of the game is to slap the book in order to make the coins flip
- Each player takes turns until someone manages to flip all the coins over to the other side
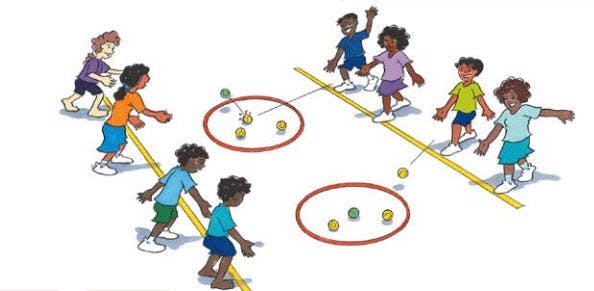
Weme (Central Australia)—15–30 minutes

A traditional indigenous game played by the Waibiri people of Central Australia, this is a bowling game in which balls are rolled underarm along the ground to knock another player’s ball out.
- Participants form a line and on each turn, a participant must have a ball
- Each participant rolls a ball underarm 10 m into a hoop and tries to knock another ball out
- This game can be played in teams or as one single line
Book Suggestions
Inuit Games by Thomas Anguti Johnston
Kids Around the World Play! by Arlette N. Braman
Download Links
Monster Athletes
Ages 3-5
15 minutes
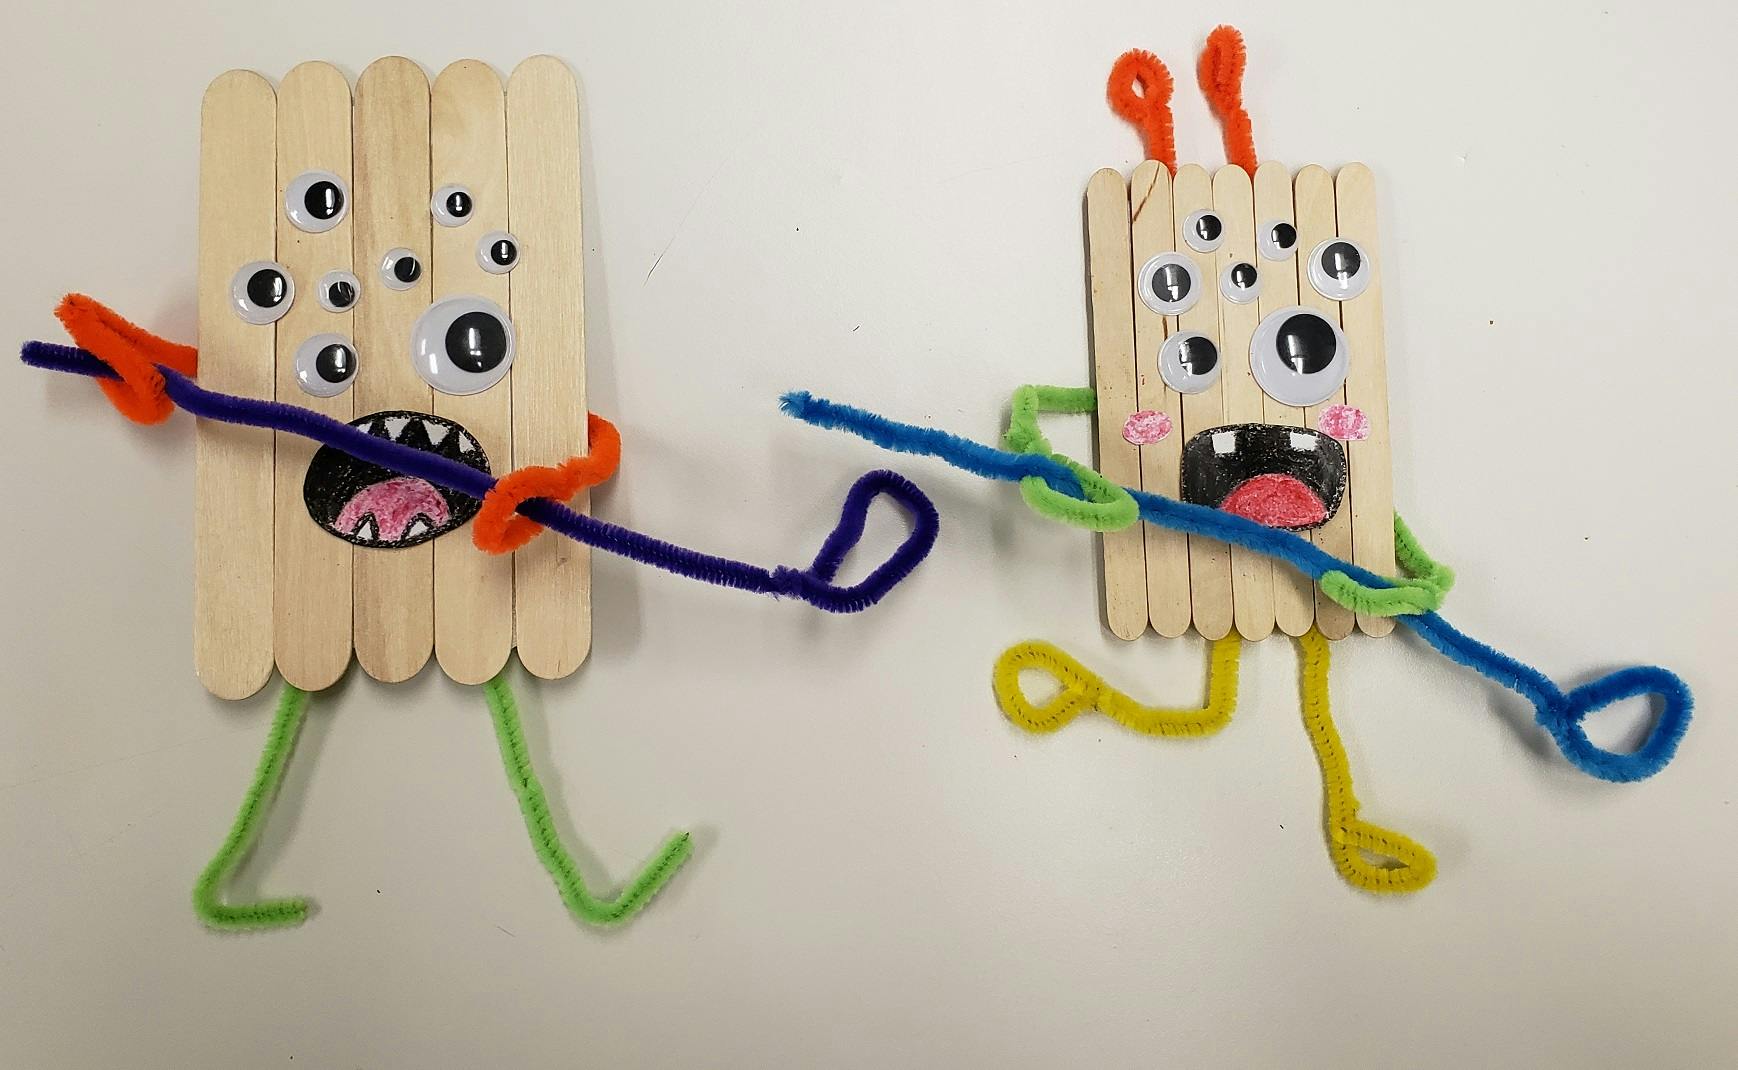
Monster Athletes
Description
Create a popsicle stick monster athlete!
Space Considerations
Any type of space where kids can be seated to do a craft
Competencies
- Artistic expression
- Creative expression
- Development of fine motor skills
- Eye-hand coordination
- Sensory motor skills
Materials
- Monster mouth templates
- 7 popsicle sticks or 5 craft sticks per participant
- Popsicle stick or craft stick templates
- Masking tape
- 3 long pipe cleaners per participant
- Googly eyes (various sizes)
- Glue sticks
- Scissors (adult use only)
- Crayons or pencil crayons
- Paper for drawing
- Extra pipe cleaners
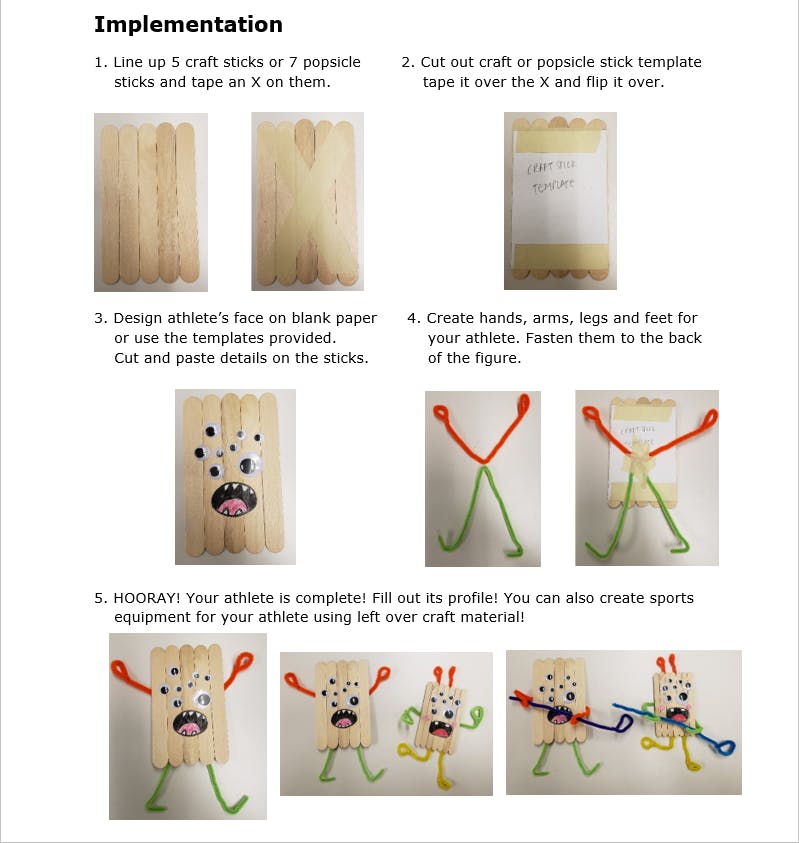
Preparation
- Print out monster mouth templates and cut them out
- Distribute 7 popsicle sticks (or 5 craft sticks), 3 long pipe cleaners, and an assortment of googly eyes to each participant
- Set out glue sticks, crayons or pencil crayons, a few sheets of the mouth templates, and blank paper
Implementation
Book Suggestions
5-Minute Basketball Stories by Sarah Howden
Lucy Tries Basketball by Lisa Bowes
Download Links
Images
Olympic Medal Design
Ages 0-3
15 minutes
Olympic Medal Design
Description
Design your very own Olympic Medal
Space Considerations
Any type of space where kids can be seated to do a craft
Competencies
- Creative expression
- Development of fine motor skills
Materials
- Card stock or regular paper
- Crayons, pencil crayons or markers
- Hole punch (adult use only)
- Scissors (adult use only)
- Ribbon or string
- Glitter, stickers or other decorative items (optional)
Preparation
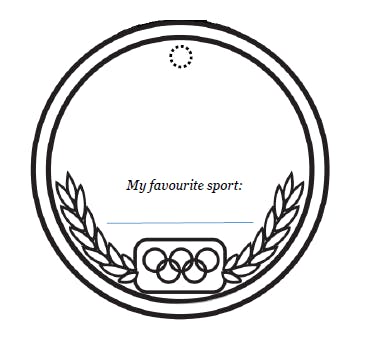
- Print out the Olympic medal templates on card stock or regular paper and cut them out (or allow caregivers to cut them out for participants)
- Punch a hole in the top of the paper medal (or allow caregivers to punch the hole)
- Cut strips of the ribbon to a size that will fit over a child’s head (approximately 30 cm)
Implementation
- Provide each participant with an Olympic medal template, an assortment of crayons and a ribbon
- If desired, provide participants with glitter, stickers or other decorative items
- Participants can write their favourite sport somewhere on the medal, with caregiver assistance as needed
- Once participants have decorated their Olympic medals, caregivers or staff can assist by stringing the ribbon through the medals
- Participants can now wear their medals proudly!
Book Suggestions
Hayley’s Journey by Sarah Howden
Swim Bark Run by Brian Boyle and Pamela Boyle
When I Grow Up—Sports Heroes by DK Children
Download Links
Images
Olympic Rhymes and Songs
Ages 0-3
5-15 minutes
Olympic Rhymes and Songs
Description
Rhymes, finger plays and songs with a fun-and-games theme, to include during story time sessions
Space Considerations
Any type of space
Competencies
- Sensory motor skills
- Development of fine motor skills
- Oral communication
- Social interaction
- Rhythm and music appreciation
- Following directions
- Eye-hand coordination
Materials
- Optional: Printout of lyrics and rhymes
Preparation
- Learn the lyrics and the associated actions for each of the rhymes, finger plays and songs
- Optional: Print out the lyrics and rhymes for caregivers to use during and after the program
Implementation
- Select the rhymes, songs and finger plays that you would like to try
- Consider combining these rhymes with some of the book suggestions for a story time program with babies or toddlers
Book Suggestions
The Dog Who Wanted to Fly by Kathy Stinson
Go Show the World: A Celebration of Indigenous Heroes by Wab Kinew
Home Run, Touchdown, Basket, Goal! Sports Poems for Little Athletes by Leo Landry
Let’s Play a Hockey Game by Kari-Lynn Winters
Swim Bark Run by Brian Boyle and Pamela Boyle
Download Links
Download Olympic Rhymes and Songs
Shake My Sillies Out—Olympic Version
Sing to the tune of “Shake My Sillies Out”
I gotta jump, jump, jump like gymnasts now
Jump, jump, jump like gymnasts now
Jump, jump, jump like gymnasts now
And polish my medal all day
(Actions: Jump whenever “jump” is said and then pretend to polish a medal)
I gotta run, run, run like sprinters now
Run, run, run like sprinters now
Run, run, run like sprinters now
And polish my medal all day
(Actions: Run in place whenever “run” is said and then pretend to polish a medal)
I gotta box, duck, box like boxers now
Box, duck, box like boxers now
Box, duck, box like boxers now
And polish my medal all day
(Actions: Punch air and duck whenever “box” and “duck” are said and then pretend to polish a medal)
I gotta shoot, shoot, shoot the basketball
Shoot, shoot, shoot the basketball
Shoot, shoot, shoot the basketball
And polish my medal all day
(Actions: Mime shooting a basketball whenever “shoot” is said and then pretend to polish a medal)
I gotta swing, swing, swing my baseball bat
Swing, swing, swing my baseball bat
Swing, swing, swing my baseball bat
And polish my medal all day
(Actions: Mime swinging a baseball bat whenever “swing” is said and then pretend to polish a medal)
I gotta kick, head, kick the soccer ball
Kick, head, kick the soccer ball
Kick, head, kick the soccer ball
And polish my medal all day
(Actions: Mime kicking and heading a soccer ball whenever “kick” and “head” are said and then pretend to polish a medal)
The Wheels on the Bus—Olympic Version
Sing to the tune of “The Wheels on the Bus”
The boxer in the ring goes box-duck-box, box-duck-box, box-duck-box
The boxer in the ring goes box-duck-box, all day long
The rider on the horse goes up and down, up and down, up and down
The rider on the horse goes up and down, all day long
The batter in the box goes swing-swing-swing, swing-swing-swing, swing-swing-swing
The batter in the box goes swing-swing-swing, all day long
The rower in the boat goes row-row-row, row-row-row, row-row-row
The rower in the boat goes row-row-row, all day long
The gymnast on the floor goes jump-jump-jump, jump-jump-jump, jump-jump-jump
The gymnast on the floor goes jump-jump-jump, all day long
The skater on the ice goes spin-spin-spin, spin-spin-spin, spin-spin-spin
The skater on the ice goes spin-spin-spin, all day long
The swimmer in the pool goes stroke-stroke-stroke, stroke-stroke-stroke, stroke-stroke-stroke
The swimmer in the pool goes stroke-stroke-stroke, all day long
Bananas Unite—Olympics Version
Sing to the tune of “Bananas Unite”
Lift the weight, lift, lift the weight
Lift the weight, lift, lift the weight
Lift the weight, lift, lift the weight
Weightlifters unite! (flex muscles)
Run in place, run, run in place
Run in place, run, run in place
Run in place, run, run in place
Runners unite! (running pose)
Aim your arrow, aim, aim your arrow
Aim your arrow, aim, aim your arrow
Aim your arrow, aim, aim your arrow
Archers unite! (archery pose)
Row the boat, row, row the boat
Row the boat, row, row the boat
Row the boat, row, row the boat
Rower unite! (rowing pose)
Surf the wave, surf, surf the wave
Surf the wave, surf, surf the wave
Surf the wave, surf, surf the wave
Surfers unite! (surfing pose)
Head and Shoulders—Football Version
Sing to the tune of “Head, Shoulders, Knees, and Toes”
Introduction: Let’s get dressed up for our football game! Ready…
Helmet, shoulder pads, knee pads and cleats
Knee pads and cleats
Knee pads and cleats
Helmet, shoulder pads, knee pads and cleats
Shorts, gloves, and socks for my feet
Hurry, Hurry, Shoot the Puck!
Sing to the tune of “Hurry, Hurry, Drive the Firetruck”
Hurry, hurry, steal the puck
Hurry, hurry, steal the puck
Hurry, hurry, steal the puck
Time is running out!
Hurry, hurry, skate down the ice
Hurry, hurry, skate down the ice
Hurry, hurry, skate down the ice
Time is running out!
Hurry, hurry, pass the puck
Hurry, hurry, pass the puck
Hurry, hurry, pass the puck
Time is running out!
Hurry, hurry, shoot the puck
Hurry, hurry, shoot the puck
Hurry, hurry, shoot the puck
Goal! Goal! Goal! Goal! Goal!
Red Light. Green Light!
Have children line up at the back and call out commands:
“Green light!” (Action: Children can proceed forward)
“Yellow light!” (Action: Children can proceed in slow motion)
“Red light!” (Action: Children must freeze where they are)
Hot Potato
1. Have participants form a circle
2. Instruct players to pass the “hot potato” (use a tennis ball, bean bag or equivalent object) as you sing the following song:
“Hot potato pass it on, pass it on, pass it on, hot potato pass it on, you…are…it!”
3. Decide on a silly and fun thing that the person holding the potato at the end of each song has to do (for example, they must run around the circle until they get back to their seat)
Take Me Out to the Ballgame
Take me out to the ball game
Take me out with the crowd
Buy me some peanuts and Cracker Jack
I don't care if I never get back
Let me root, root, root for the home team
If they don't win, it's a shame
For it's one, two, three strikes, you're out
At the old ball game
Olympic and Paralympic BINGO
Ages 3-5
35 minutes
Olympic and Paralympic BINGO
Description
Try your luck in this interactive picture BINGO and learn to identify the sports of the 2020 Olympic and Paralympic Games
Number of Participants
There are 39 unique BINGO cards; you can print these cards more than once for larger groups, but know that some participants would then get a BINGO at the same time
Space Considerations
An indoor space with room for children and their caregivers to be seated with BINGO cards and small tokens
Competencies
- Following directions
- Social interaction
Materials
- BINGO cards printed, preferably in colour, on card stock or regular paper (If desired, you can laminate the cards for extra durability, especially if using them for multiple programs)
- Word list
- Small paper scraps (no bigger than each BINGO square) or small tokens
- Container for word cut-outs
- Prizes (optional)
- Number templates to identify winning order
- Scissors (for adult use only)
Preparation
- Print the word list, cut the words out and place them in a container
- Cut paper scraps for kids to cover the called-out words
- If giving prizes, each prize should be fairly equal in value and there should be plenty of selection and duplicates to ensure all kids leave the program happy
Implementation
- Hand out one BINGO card to each participant as they enter the program
- Shake the container with the list of words and pull out one strip at a time
- Each time, call out the letter (B, I, N, G or O) and the Olympic or Paralympic sport on the slip (The letter indicates which column participants should look down—a sport will only appear in that column on all cards)
- Repeat the call-out to ensure everyone is able to clearly hear you
- Participants look at their cards and place a paper scrap or token on top of the sports that have been called out (Called-out sports should remain covered for the full duration of the game)
- The first participant to get five in a row horizontally, diagonally or vertically should shout out BINGO!
- It is optional to offer prizes for this program—the first player to get a line could receive the first prize (If using prizes, it is important that all children receive prizes in the program, not just one winner)
- After the first one-line BINGO, a recommended way to play would be to simply continue the game with all participants attempting to now get a full card (all 25 sports covered) rather than a full line
- The first player to get a full card should shout out BINGO!
- This participant could then select a prize, or, depending on the size of the crowd, could be given a printed number 1 and would be the first in line during the prize selection
- The game continues until every participant gets a full card (i.e. BINGO) and receives either a prize or a number in line to select a prize
- If using the prize numbering system, participants would line up in the order they obtained their full-card BINGO to select from a variety of prizes
- It is likely many kids will get BINGO at the same time; generally, a fair way to assign prize selection order in these case is to allow younger players to select prizes before older players
Book Suggestions
Game On in Ancient Greece by Linda Bailey
Meet Tom Longboat by Elizabeth MacLeod
Scholastic Year in Sports 2020 by James Buckley Jr.
Team Steve by Kelly Collier
The Wildest Race Ever: The Story of the 1904 Olympic Marathon by Meghan McCarthy
Download Links
Templates
Paper Planes
Ages 6-8
20 minutes
Paper Planes
Description
Make paper planes and test how far they can glide through the air.
Space Considerations
A large space, indoors or outdoors, where kids can launch their airplanes safely. It is optional to have access to chairs so kids can experiment with launching their planes further.
Competencies
- Development of fine motor skills
- Problem solving
Materials
- Paper
- Paper clip (optional)
- Tape (optional)
- Chairs (optional)
- Crayons, pencil crayons or markers
Implementation
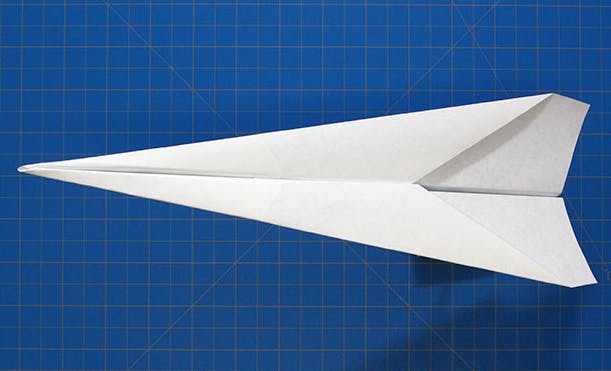
1. Use the template below and follow the steps to create a simple paper plane by folding a 8.5 x 11 piece of paper
2. Optional: Decorate your plane using crayons, pencil crayons or markers
3. Optional: View and print the free templates available online to make planes of varying folding complexity
4. Optional: Bring library books with paper plane designs into the program so participants can try to make more planes
With adult supervision only, after constructing a plane:
5. Mark how far your plane flew on your first throw
6. Straighten a paper clip out to form a hook (adult assistance may be needed):
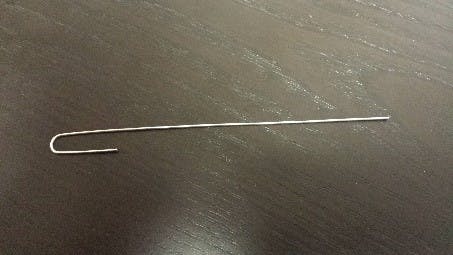
7. Securely tape the long side of the paper clip to the nose of the paper plane, with the hook in front and facing downward
8. Flip a chair upside down so the legs are pointing up
9. Stretch a rubber band between two of the chair’s legs
10. Hook the rubber band around the hook of the paper clip (which should be securely attached to your plane)
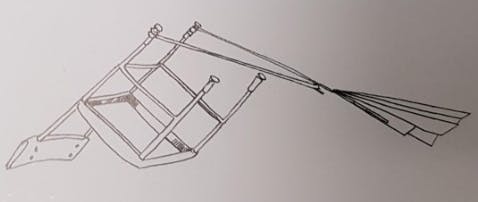
Image from The 101 Coolest Science Experiments by Rachel Miller, Holly Homer, and Jamie Harrington
11. Pull the plane back and let it soar; by pulling back the rubber band you created resistance and potential energy
Book Suggestions
The Canadian Kids’ Guide to Outdoor Fun by Helaine Becker
The Dog Who Wanted to Fly by Kathy Stinson
Dog vs. Ultra Dog by Troy Wilson
Download Links
Images
Pencil-and-Paper Games
Ages 9-12
5-30 minutes
Pencil-and-Paper Games
Description
A collection of pencil-and-paper games that can be used in a program or adapted for passive programming in your libraries
Space Considerations
Any type of space with seating for participants
Competencies
- Creative and imaginative thinking
- Logic and sequencing
- Following directions
- Problem solving
- Teamwork
- Strategic thinking
Materials
- Pen or pencil
- Paper
- Timer or stopwatch (optional)
Implementation
Select pencil-and-paper games from our list and modify as desired to fit the number of participants in your program.

Book Suggestions
Mr. Lemoncello's Library Olympics by Chris Grabenstein
Extreme Abilities: Amazing Human Feats and the Simple Science Behind Them by Galadriel Watson
Bird & Squirrel: All Tangled Up by James Burks
Download Links
Images and Templates
Photo Props
Ages 6-8
20-60 minutes
Photo Props
Description
Create your own photo props and cheer your team on!
Space Considerations
Any type of space where kids can be seated to do a craft
Competencies
- Artistic expression
- Creative expression
- Development of fine motor skills
- Eye-hand coordination
- Number recognition
Materials
- Card stock paper
- Crayons, pencil crayons or markers
- Glue (optional)
- Craft stick
- Tape
- Scissors
Preparation
- Print out speech bubble templates as examples and for younger participants (optional)
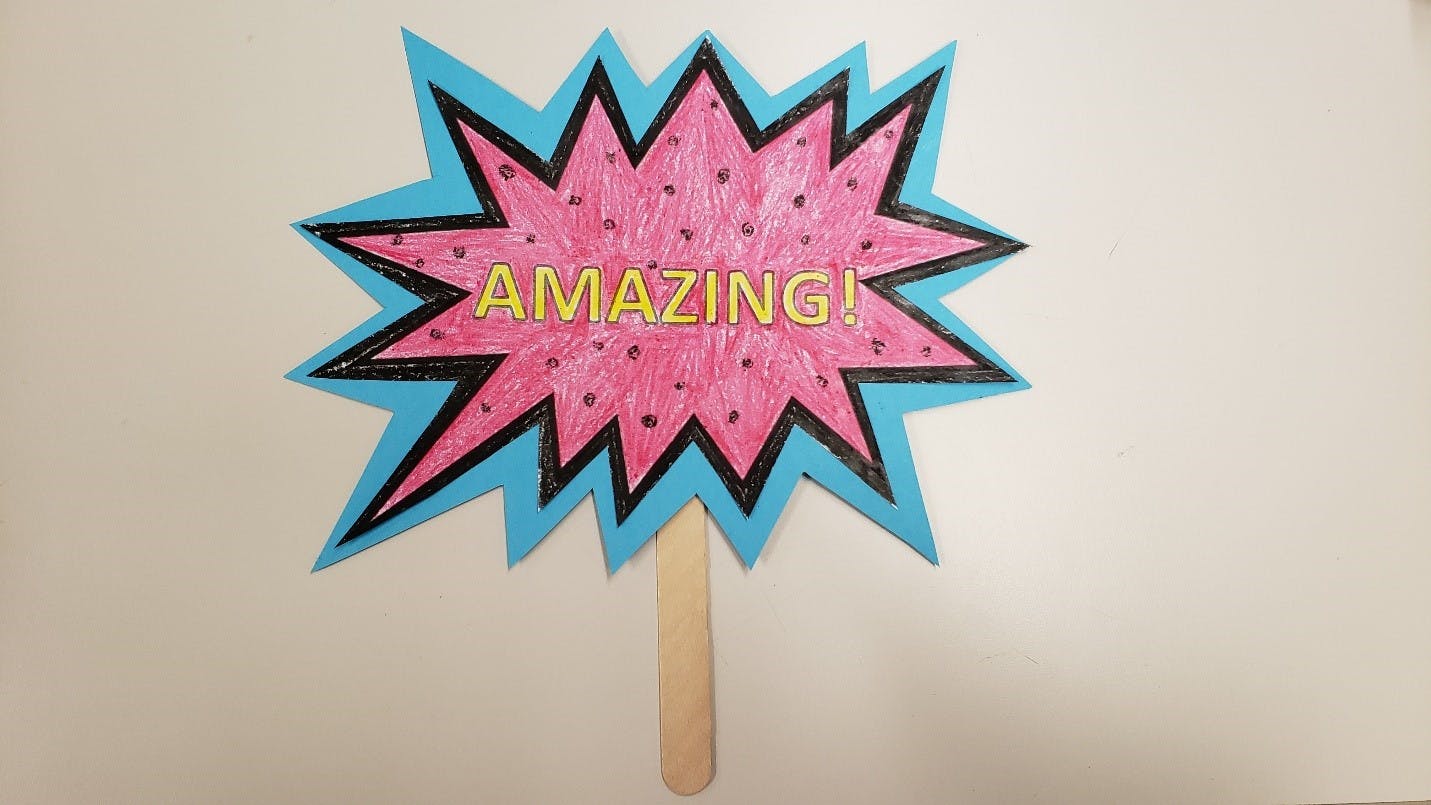
Implementation
- Provide each participant with a blank piece of card stock or a speech bubble template, an assortment of crayons, pencil crayons or markers, and a craft stick
- Provide scissors, tape and glue (optional) to be shared among participants
- Provide speech bubble templates as examples
- Each participant designs their own speech bubble and cheer, or they use the template and write their own cheer
- After a participant has completed their sign, they can cut it out
- Optional: Participants can mount their signs on another piece of card stock and cut out a slightly larger bubble to create a frame
- Tape a craft stick to the back of the sign, ready to be used as a photo prop!
Book Suggestions
5-Minute Basketball Stories by Sarah Howden
Basketballogy by Kevin Sylvester
Home Run, Touchdown, Basket, Goal! Sports Poems for Little Athletes by Leo Landry
Scholastic Year in Sports 2020 by James Buckley Jr.
The Day My Dad Joined My Soccer Team by Maureen Fergus
Download Links
Images
Playdough Letter Maze
Ages 0-3
15 minutes
Playdough Letter Maze
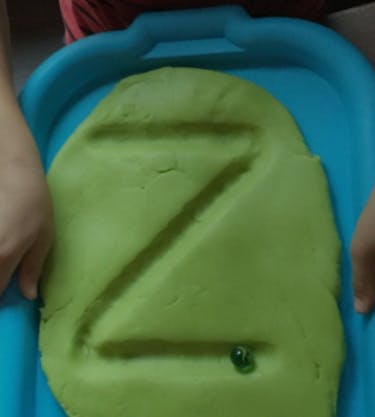
Description
Caregivers help children guide a marble (or trace a finger) through a playdough letter maze
Space Considerations
Any type of space
Competencies
- Eye-hand coordination
- Sensory motor skills
- Fine motor skills
Materials
- Playdough
- Marbles or other small objects
- Paper plates or trays
Preparation
- Flatten a large amount of playdough on a tray or a paper plate for each participant
Implementation
- Distribute the prepared trays or paper plates with playdough to participants
- Each caregiver guides a participant in tracing a large letter in the playdough, which will create an indent
- Place the marble at the starting point of the letter (usually top left)
- Each participant uses their finger to guide the marble through the shape of the letter—Important note: When using marbles or small objects, caregivers should be reminded to use extra caution to ensure children do not put the object near their mouths or swallow them
- Option for preschoolers: For an extra challenge, allow the preschooler to hold and manipulate the base of the tray or plate as they attempt to guide the marble through the maze without touching the marble
- Once a participant has completed one letter maze, the caregiver can roll and then flatten the playdough and then try a different letter (or a number)
Book Suggestions
Frida and Bear Play the Shape Game by Anthony Browne and Hanne Bartholin
The Thing Lou Couldn’t Do by Ashley Spires
Yoga Baby by Amy Hovey
Download Links
Images
Images from Teach Me Mommy website
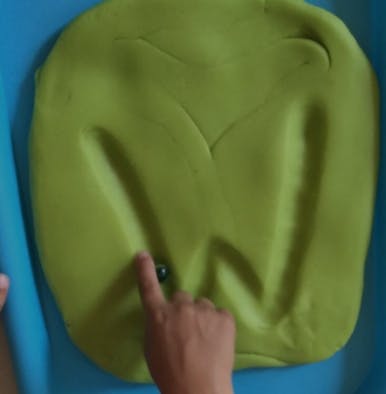
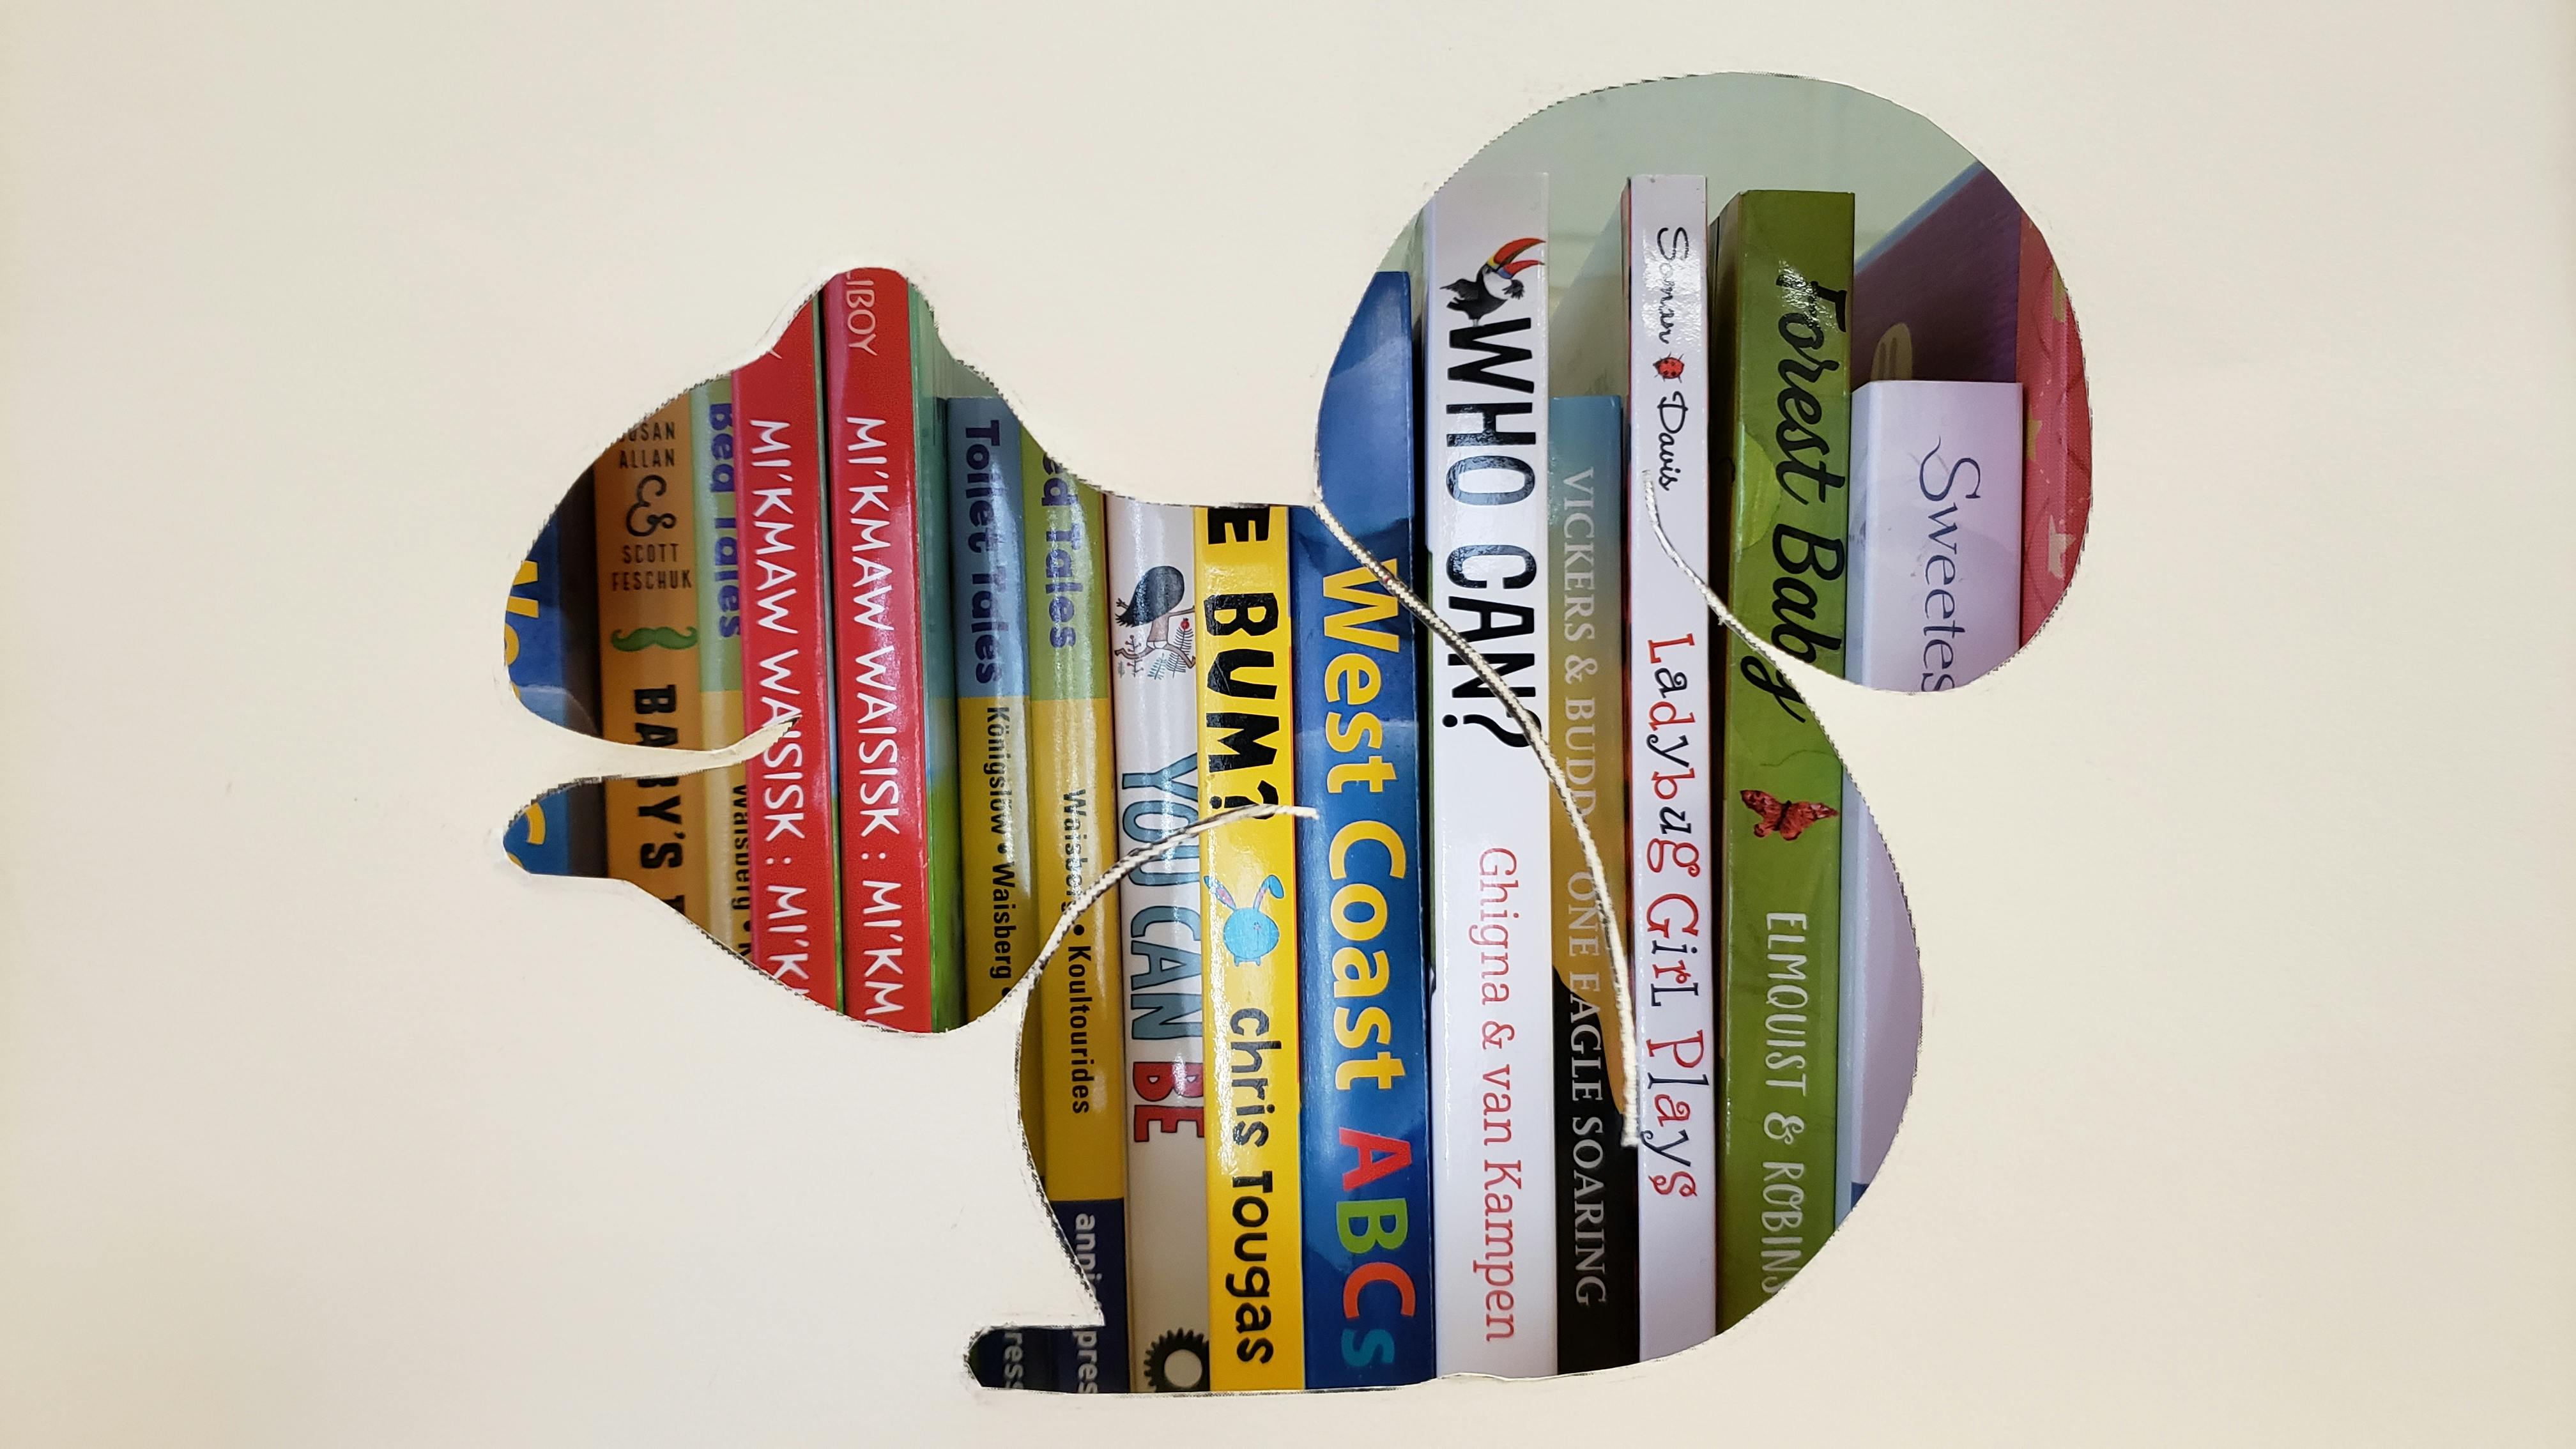
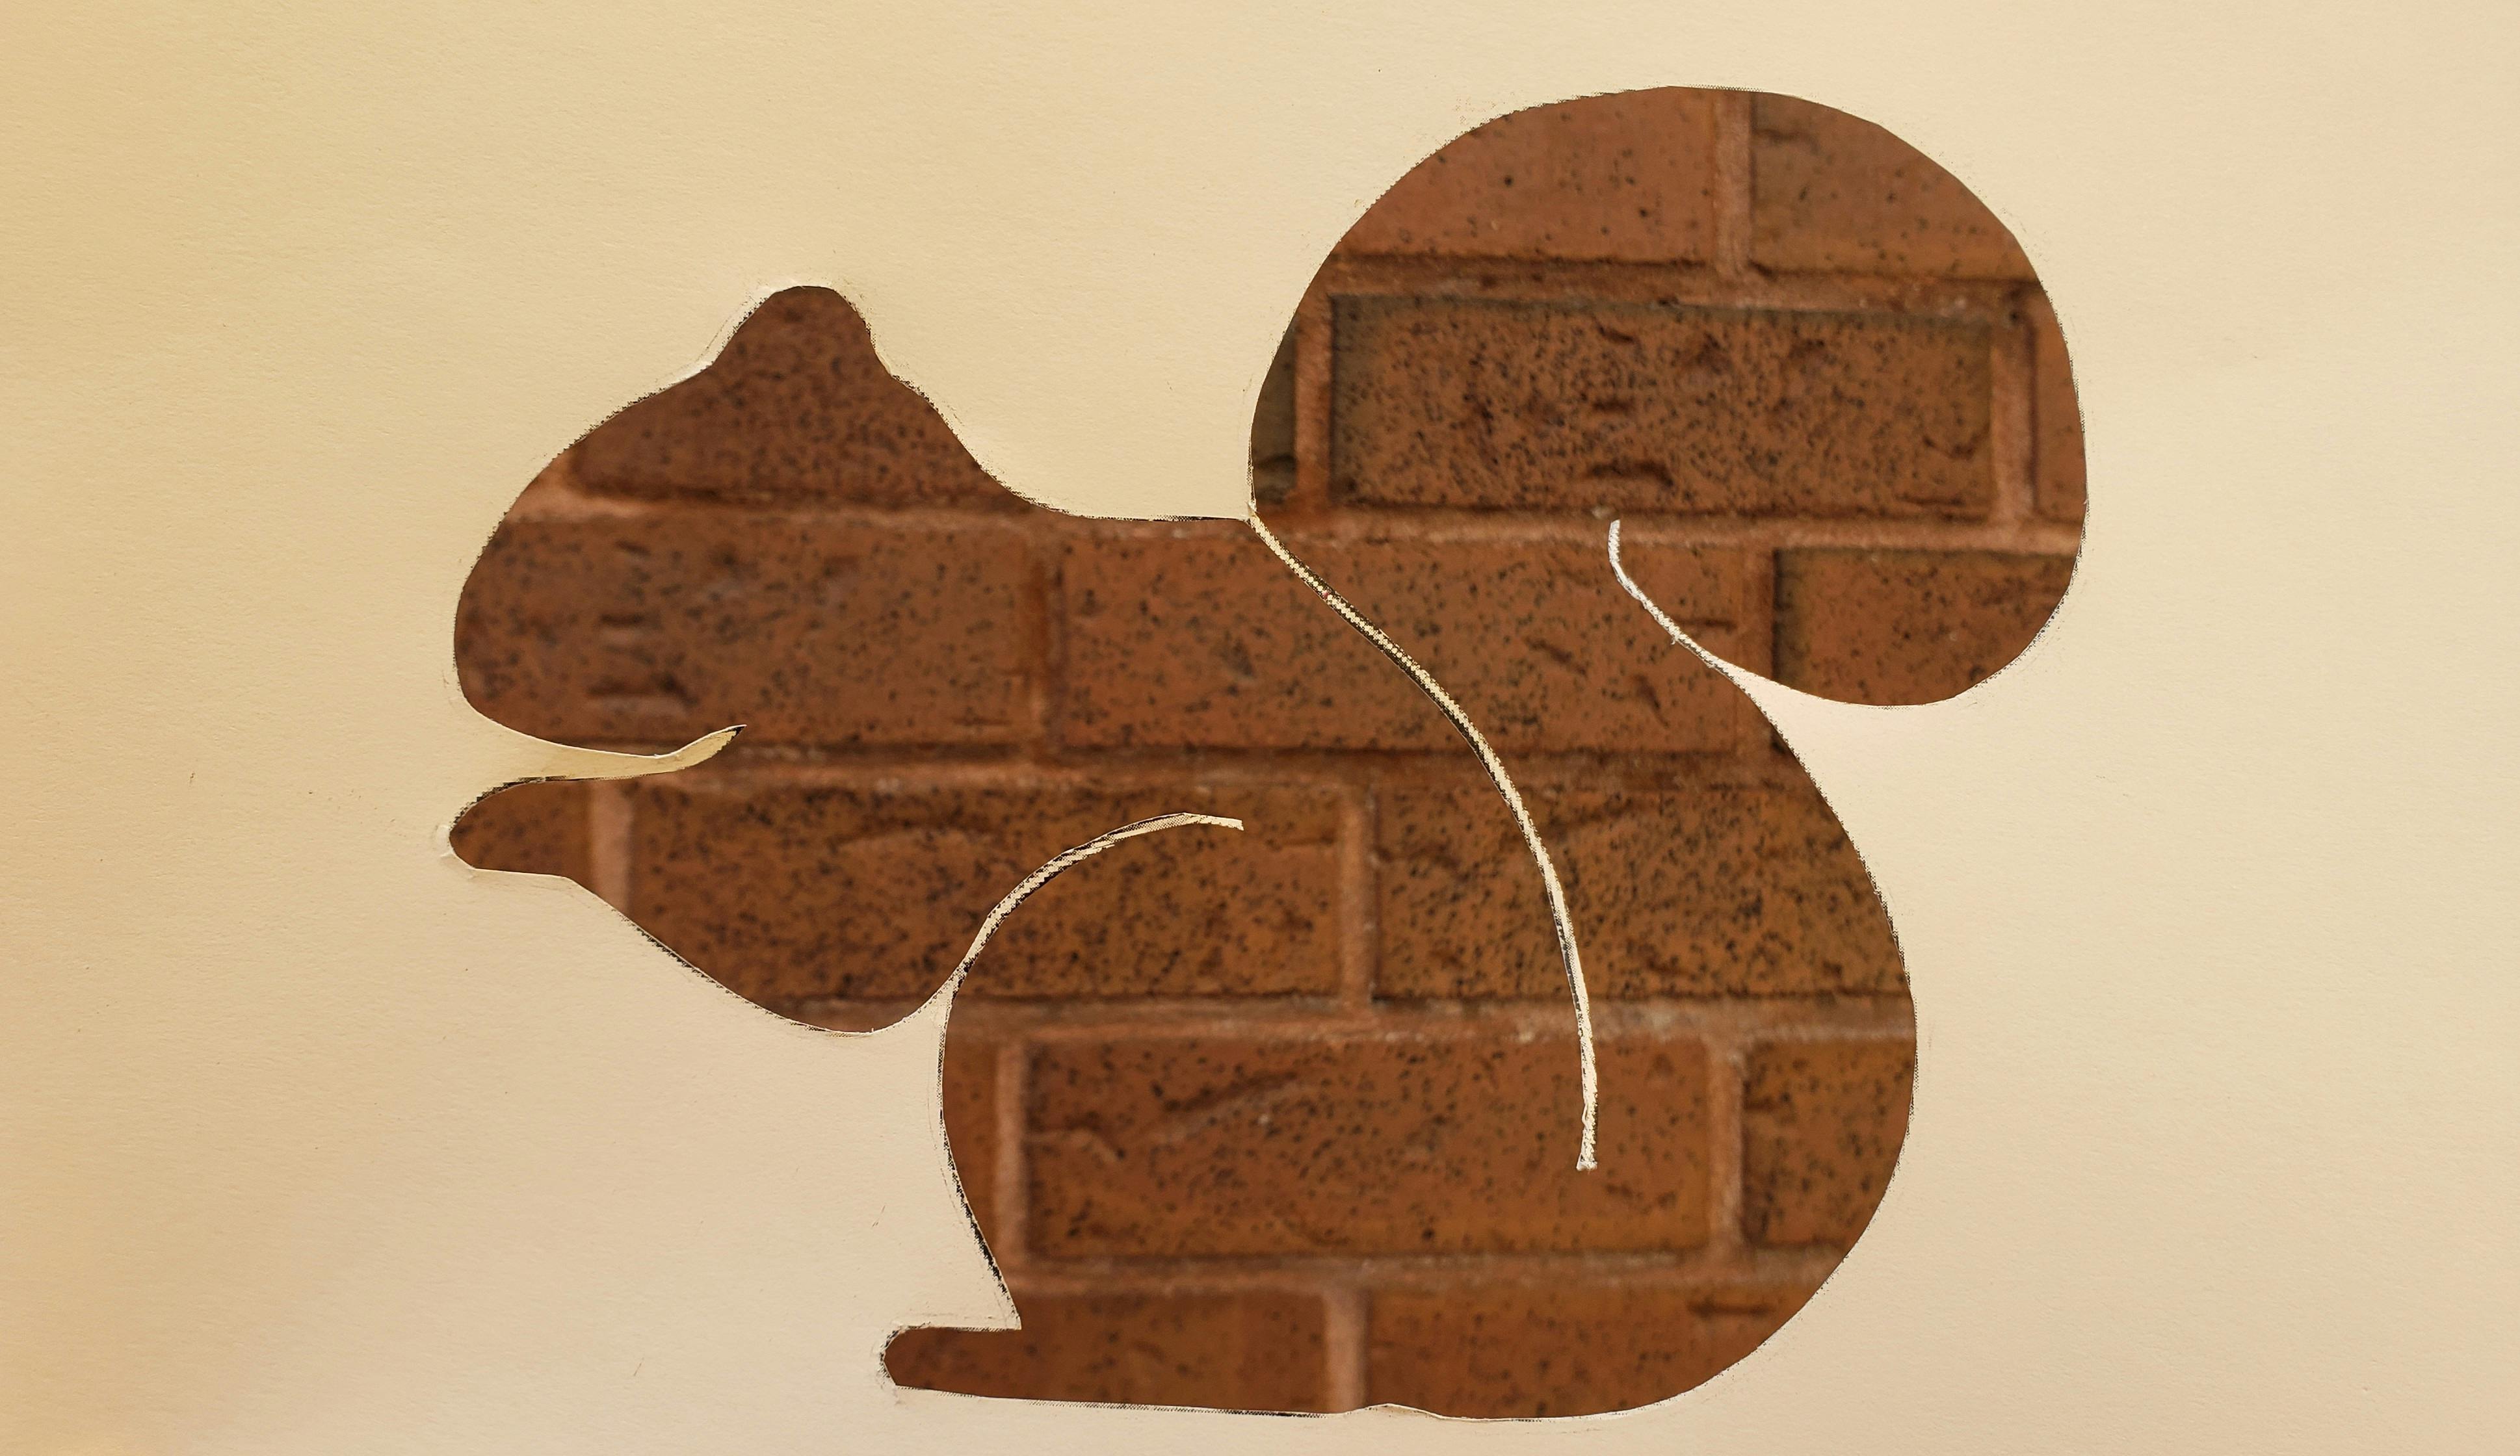
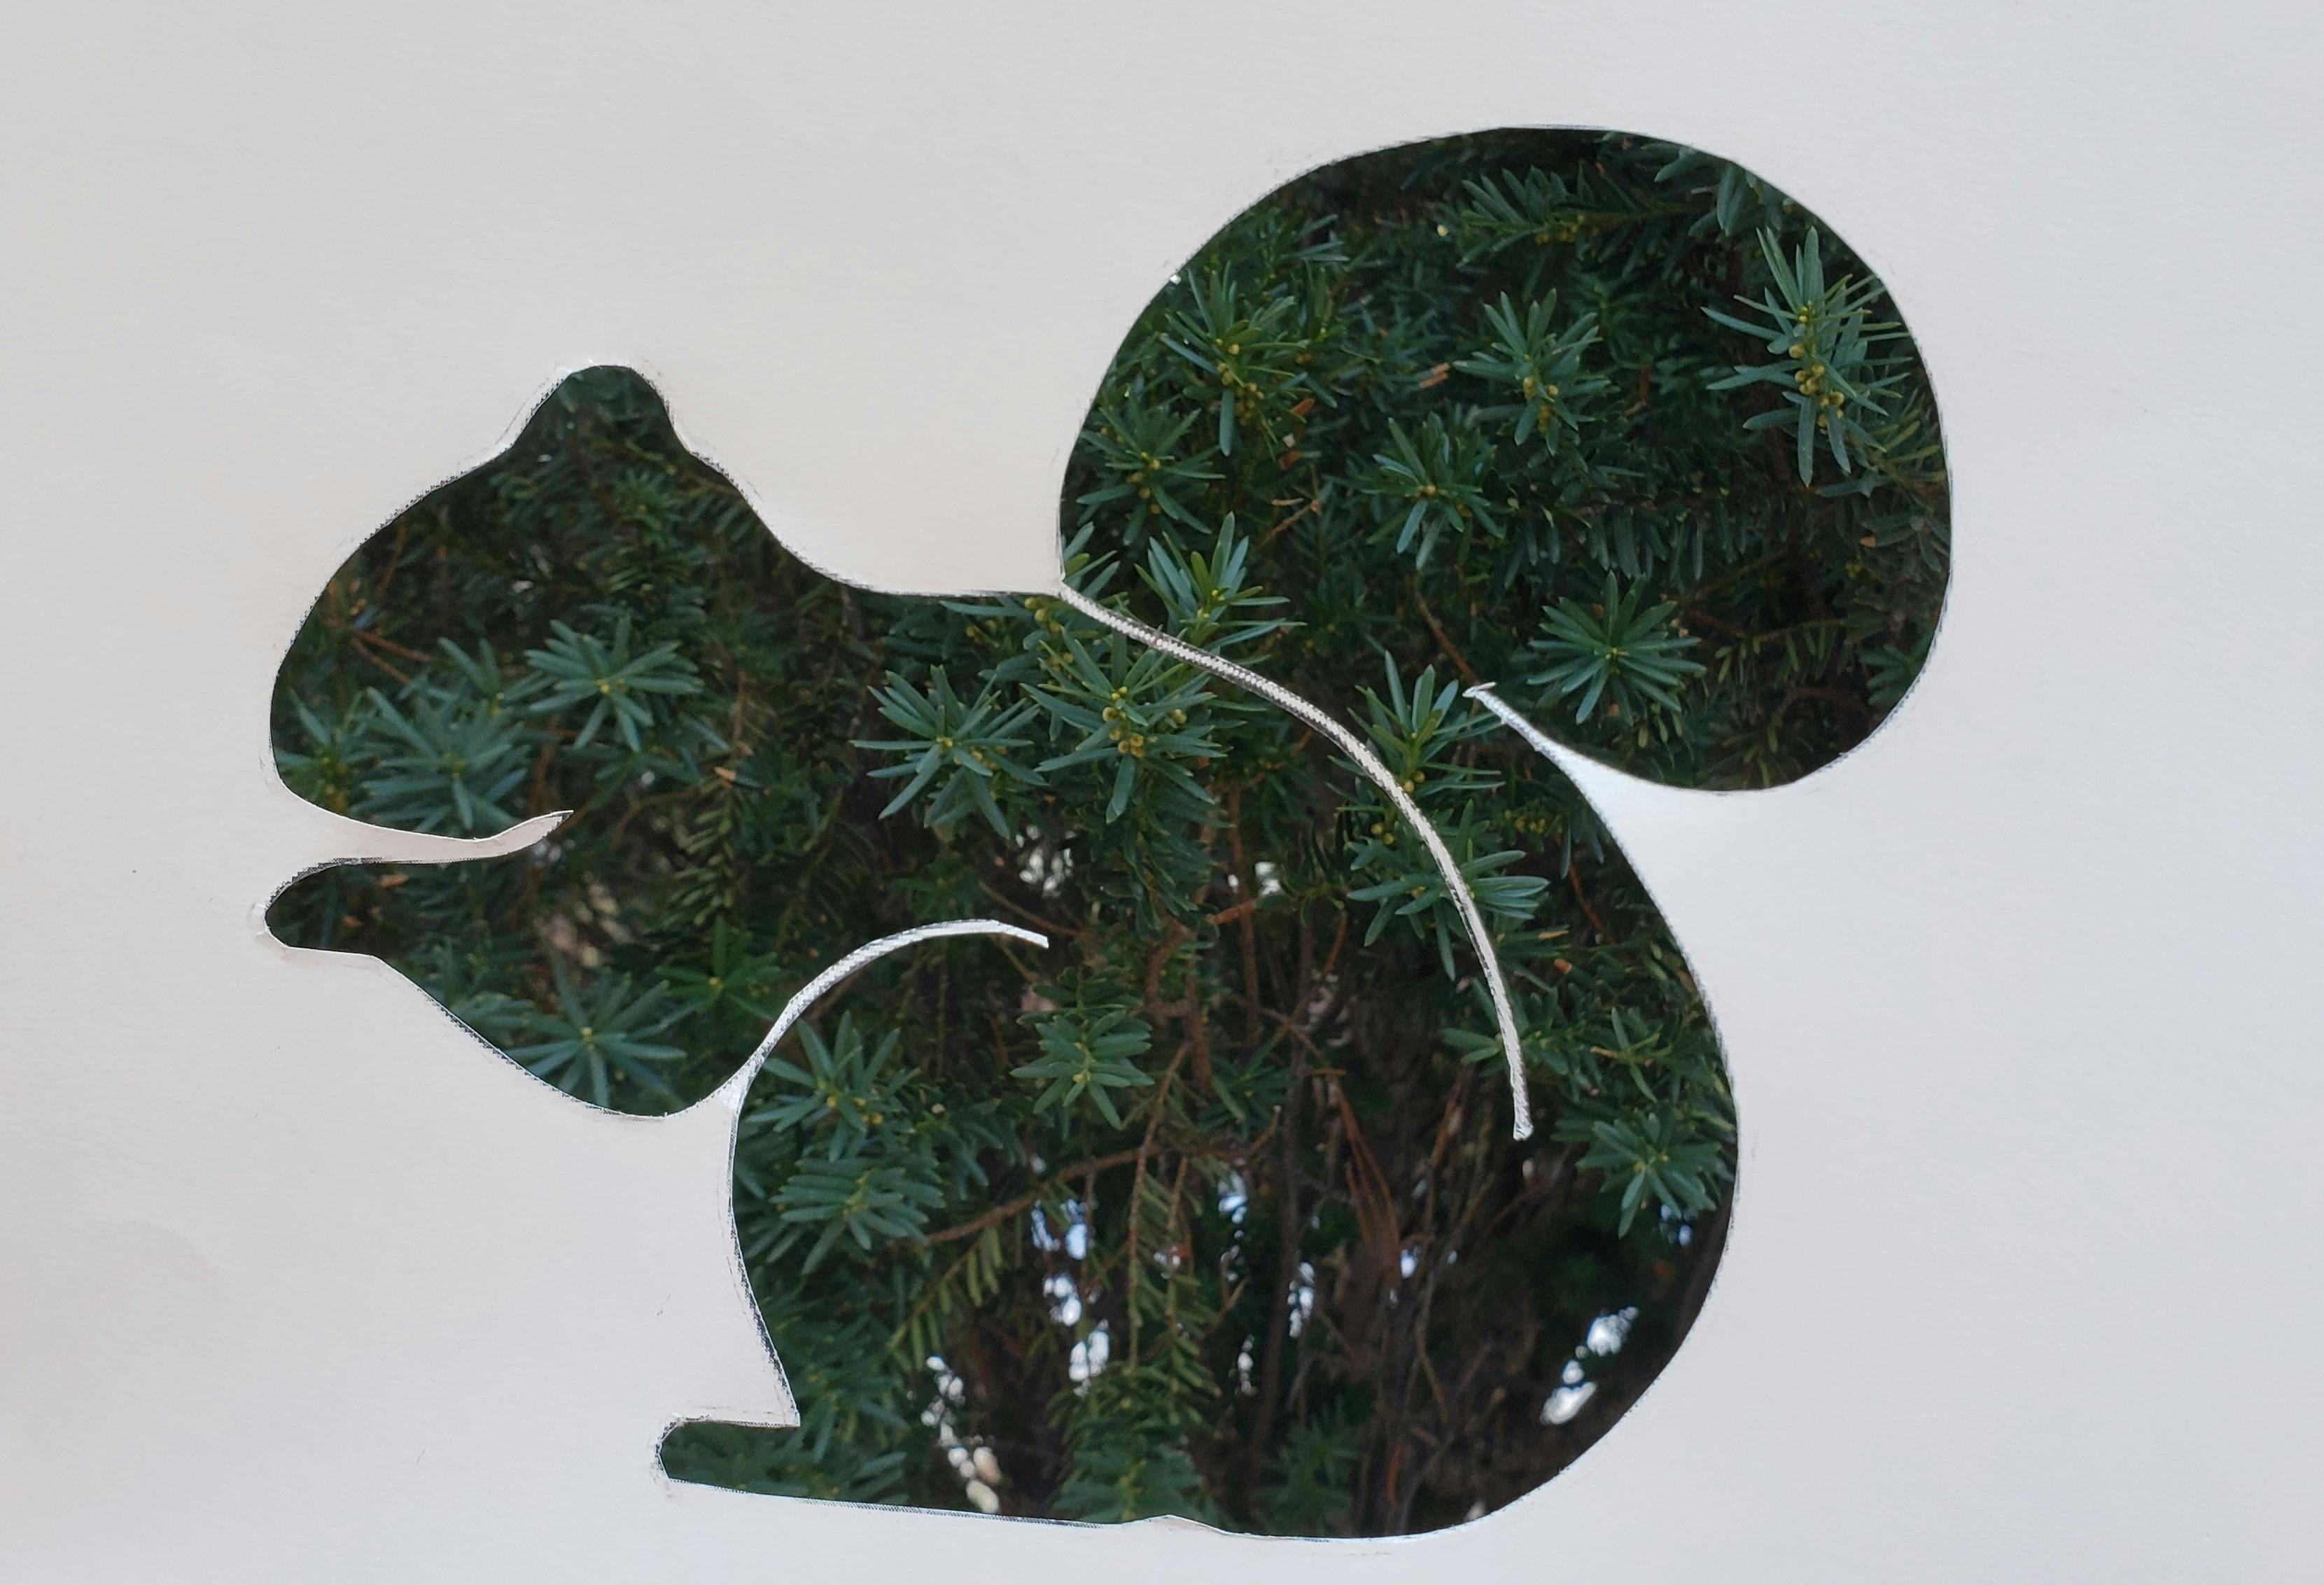
Playing with Textures
Ages 0-3
15-30 minutes
Playing with Textures
Description
Cut out a picture of an animal and use bookshelves, walls, nature and more as textures for the animal’s body. Take a walk and see what kind of textured animals you can create. If you have access to a smartphone or camera, you can take photos of your creation!
Space Considerations
Any type of space where kids can be seated to do a craft
Competencies
- Artistic expression
- Creative expression
- Development of fine motor skills
Materials
- Card stock
- Scissors (adult use only)
- White paper
- Crayons or pencil crayons
- Smartphone or camera (optional)
- A book truck with two shelves full of children’s books to use as a backdrop (optional)
Preparation
- Print the animal templates
Implementation
- Provide each participant with a white piece of paper to decorate
- Distribute animal silhouette printouts to the adults to form stencils by cutting out the animal without cutting the surrounding paper
- Child and parent or caregiver hold the animal cutout over their decorated sheet of paper to see their first textured animal
- Then, they walk around finding other textures for their animal
- If they have a smartphone or camera they can take a photo of it, like in the examples below
- Participants are encouraged to create textured animals using:
- their decorated sheet of paper
- favourite book shelf
- a wall, carpet or floor
- something in nature
- their own clothes
7. Ask your family and friends what animal you cut out and what you used for the texture!
Book Suggestions
Frida and the Bear Play the Shape Game! by Anthony Browne and Hanne Bartholin
In a Minute: Take the 60-Second Challenge by Clare Lowther
Look & Find Animals by Kirsteen Robson
Download Links
Images and Templates
Rubber Band Car
Ages 9-12
45 minutes
Rubber Band Car
Description
Create a rubber band car with templates adapted from the book Amazing Rubber Band Cars by Mike Rigsby
Space Considerations
A large space where participants have access to a table to spread out their craft supplies
Competencies
- Creative and imaginative thinking
- Development of fine motor skills
- Following directions
- Organization and planning
- Problem solving
Materials
- Corrugated cardboard (from cardboard boxes)
- Scissors
- Push-pins
- Two round pencils per participant
- Glue
- 2 rubber bands per participant
- Markers or paint (optional)
Preparation
- Prepare the room for a program that uses glue or paint
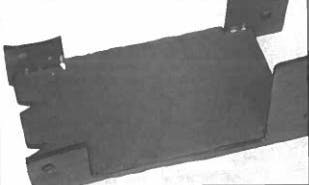
Implementation
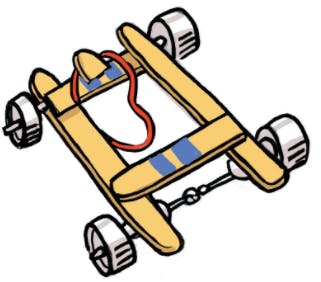
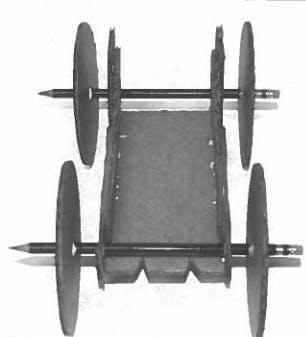
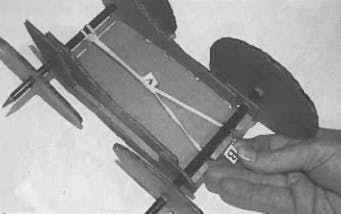
1. Copy the templates onto cardboard—you will need one floor (1a), two frames (1b), two side rails (1c), and four wheels (1d)
2. Cut all the pieces out of the cardboard, taking care to make the wheels as round as possible in order for the car to move well
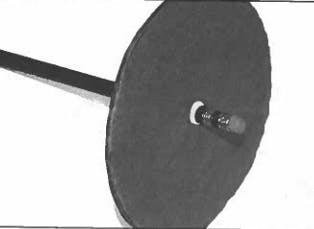
3. Use a push-pin to mark the centre point of the wheels, using the hole on the template as a guide
4. Push a pencil into the centre point of one wheel, pushing it through the cardboard, as pictured (When making the holes in the wheels, you want a snug fit, so when the pencil turns, the wheel should turn as well)
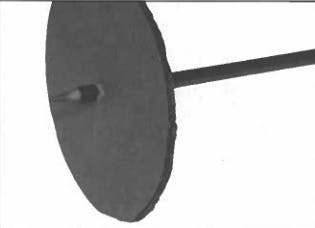
5. Remove the pencil once you make the hole
6. Make the axle holes in the frame pieces
7. Move the pencil in all directions to make the axle holes bigger, so the pencils will turn freely in the frame
8. Remove the pencil once you make the hole
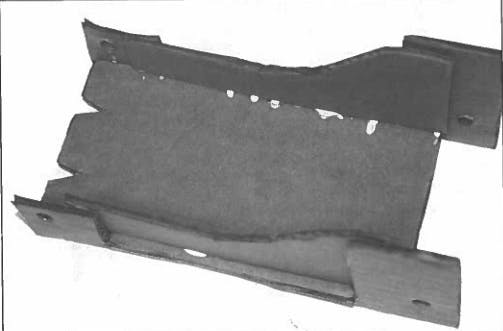
9. Glue the floor to the two frame pieces by placing an ample amount of glue wherever the cardboard pieces touch
10. Glue the side rails to the inside of the frame, on both sides
11. Attach the wheels to the axles by pushing one of the wheels over a pencil and sliding it close to the eraser end
12. Place a little bit of glue (or masking tape) around the pencil for a secure connection to the wheel
13. Insert the wheel and pencil through the axle holes at the back of the car frame (the higher part of the frame)
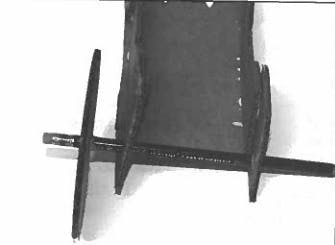
14. Push a second wheel onto the other end of the pencil and glue it into place
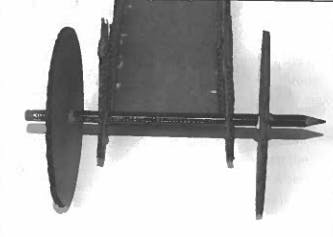
15. Now assemble the front wheels and axles in the same way as the back (push a wheel onto a pencil until it moves through to the eraser end, glue or tape it securely, insert the pencil through the frame’s front axle holes and then add the final wheel onto the other end of the pencil, gluing it securely)
16. Allow the glue to dry (usually about 10 minutes)
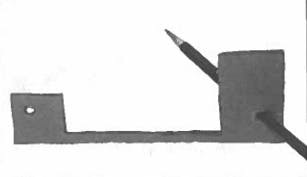
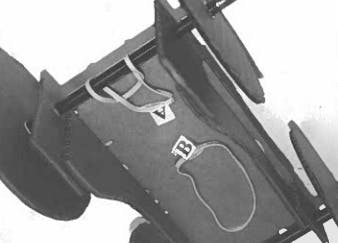
17. Place one rubber band under the rear pencil (In the image below, a tab labelled A is included just for orientation—you do not need to create this tab or label your rubber band)
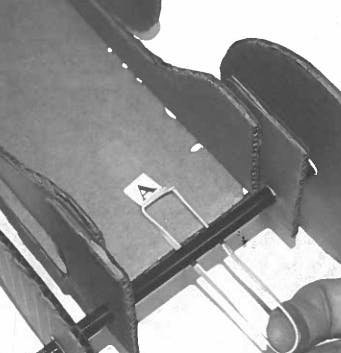
18. Pull the end of the rubber band over top of the pencil and through the other end of the band:
19. Pull the rubber band up over the pencil and lay it on the floor of the car:
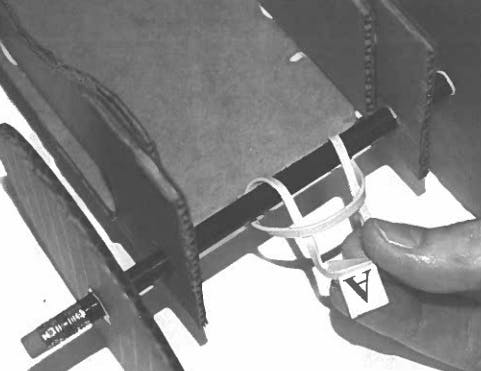
20. Place a second rubber band on the floor of the car (This one is labelled with a tab B, but again, this is just for your orientation—you do not need the tab)
21. Move the second rubber band so that it is under the first rubber band, then pull it through the first rubber band
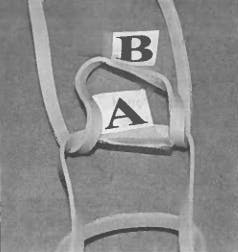
22. Pull the tab B end of the rubber band under and through the forward end of the other rubber band, which will ensure the two rubber bands are tightly linked together
23. Stretch the tab B end of the rubber band toward the front of the car
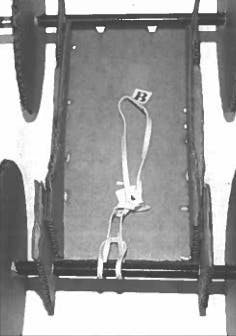
24. Loop the tab B end over the v-shaped slits at the front of the car
25. Your car is ready for its first trial; wind the rear wheel backward and let it go
26. If desired, decorate your car using markers or paint
Book Suggestions
Mr. Lemoncello’s All Star Breakout Game by Chris Grabenstein
The Wildest Race Ever: The Story of the 1904 Olympic Marathon by Meghan McCarthy
Download Links
Templates
Scavenger Hunt
Ages 6-8
30-45 minutes
Scavenger Hunt
Description
A hybrid of bingo and scavenger hunt, participants must find answers and write them in the boxes. They can complete as many horizontal lines as you want them to or complete the ultimate challenge of the entire card.
Space Considerations
- A space for participants to interact and complete their cards
- Optional: Participants may need access to the library’s collection and possibly computers
Competencies
- Following directions
- Oral communication skills
- Problem solving
- Social interaction
- Working collaboratively
- Number recognition
Materials
- Card stock or printer paper
- Crayons, pencil crayons or markers
Preparation
- Print out a bingo card for each participant. We recommend using 8.5 x 14 (legal size) paper in order to be more accessible, but if you don’t have that size you can use 8.5 x 11 (letter size) paper.
- Determine your rules:
o How many horizontal lines would you like them to fill out in order to complete the activity? (e.g. 2 lines, 3 lines, the complete card)
o How flexible will you be for answers? Can they use the same person for various answers or must it be a different person for each box? (e.g.: Cam can wink with her left eye and was born in Asia)
o Do you want them to find answers only by asking other participants or do you want them to have access to computers or tablets to look up call numbers or search on the internet? - Sample rules:
o Participants must complete 3 lines.
o The same person’s name may only be used in one box on the card.
o Participants may use tablets and the library collection to find answers.
o You may work in teams to complete the activity.
Implementation
- Explain the activity:
o When you receive your scavenger hunt card, there will be 5 lines of boxes
o You must fill out ____ [number] of horizontal lines to complete the card
o The same person’s name can be used _____ time(s) on the card
o You may find your answers by talking to other participants and by looking in the library collection
o Optional: You may also search the internet on our tablets or computers
o Do not run and when in the library area, please be mindful of others who may be doing their work or studying
o (Optional) You can work together to find your answers
o When you are finished, please bring your completed card to ___________
2. Distribute pencils and the cards facedown, instructing participants to not turn them over until you tell them to
3. Ask if anyone has questions before you begin, then start!
Book Suggestions
Extreme Abilities: Amazing Human Feats and the Simple Science Behind Them by Galadriel Watson
Focused by Alyson Gerber
Scholastic Year in Sports 2020 by James Buckley Jr.
Download Links
Images and Templates
Shuffleboard Math
Ages 6-8
10-20 minutes
Shuffleboard Math
Description
Put your math skills to the test in this fun tossing game
Space Considerations
Indoor or outdoor space, with enough room to safely toss or slide small objects
Competencies
- Mathematical skills
- Sensory motor skills
- Teamwork
Materials
- Beanbags, squishy balls, rocks, coins or any suitable substitute based on your preferred setting and method of play
- Masking or painter’s tape (if playing indoors)
- Chalk (if playing outdoors)
- String (optional for indoor or outdoor play)
- Hockey stick, broom or shuffleboard stick (if sliding objects instead of tossing)
- Pencil and paper for keeping score
Preparation
- Create the playing surface:
o Use string, tape or chalk (outdoors only) to identify different scoring areas
o Create scoring areas of different sizes
o Assign points for these areas based on their size—larger landing areas should be worth less points than smaller landing areas
Implementation
Modify the rules as needed based on the number of participants, whether you prefer a team activity or an individual activity, your preferred playing surface, and whether tossing or sliding the objects.
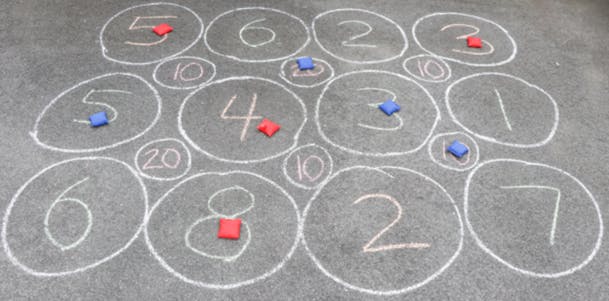
The following steps are written for two participants who are tossing beanbags outdoors (see image below):
- Give each participant four beanbags—use a different colour for each participant or make it clear which beanbags belong to one participant vs the other
- Participants should line up behind a throwing line, which can be any pre-determined distance from the scoring area that is suitable for the setting and the ages and skill levels of participants (10 feet is a recommended distance for ages 6–8)
- Participants underhand toss their beanbag, aiming for the scoring areas
- Participants should alternate throws
- Once both participants have taken all of their throws, they work together to score the round by adding up the points for all the beanbags within the scoring area
- Complete as many rounds as desired, totalling scores for each round to determine a winner
- For an added math component, consider adding rules where participants add up their scores using the following formula, assuming they make four shots each: (a+b+c) x d, where a is the score for the first shot, b the score for the second and so on—this will involve memory as well as math skills!
- Encourage participants to think of other formulas for scoring their game, which can include addition and multiplication in any combination—this is where you may need the pencil and paper!
This activity can easily be adapted to a team activity (e.g. 4 participants per team, or more) our preferred
Book Suggestions
Big Game Jitters by L.M. Nicodemo
Dog vs. Ultra Dog by Troy Wilson
Home Run, Touchdown, Basket, Goal! Sports Poems for Little Athletes by Leo Landry
In a Minute: Take the 60-Second Challenge by Claire Lowther
Download Links
Images
Image from Susan Jones Teaching website
Sports Jerseys
Ages 6-8
20-60 minutes
Sports Jerseys
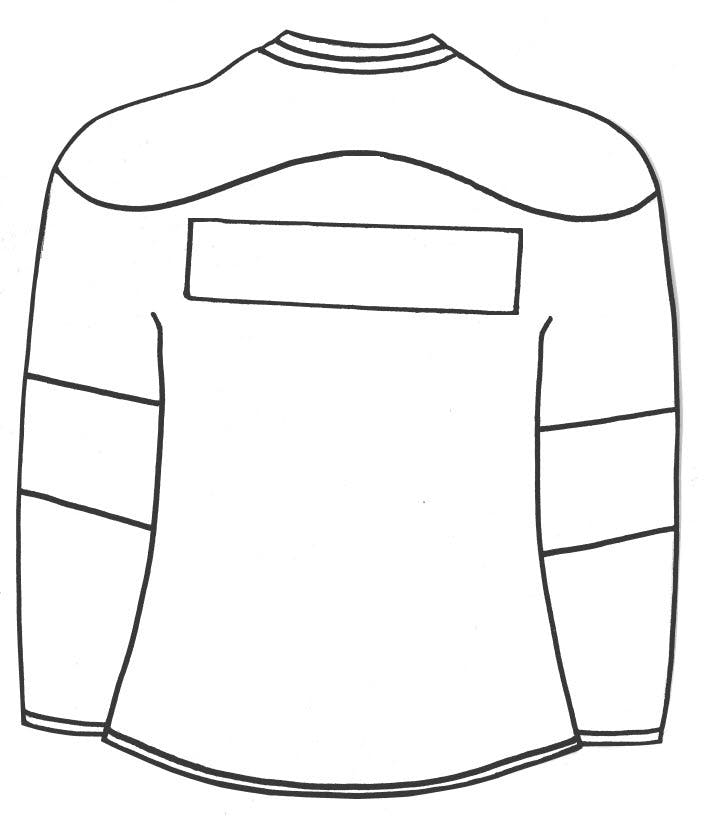
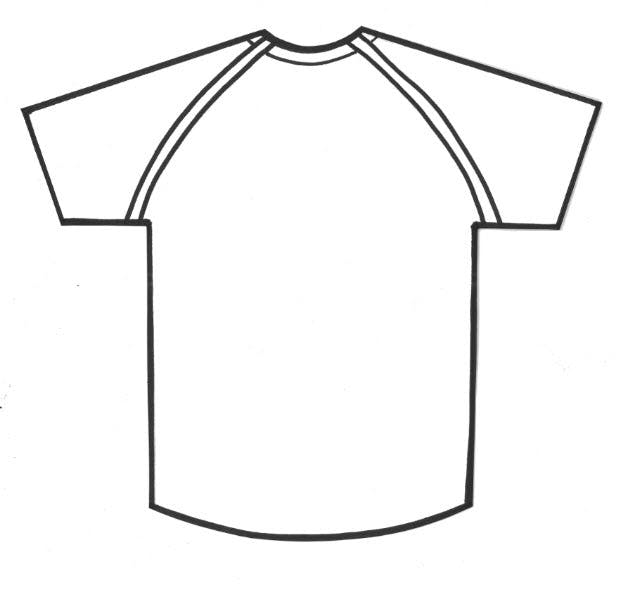
Description
Design your own hockey, basketball or lacrosse jersey using the templates provided or design a jersey from scratch
Space Considerations
Any type of space where kids can be seated to do a craft
Competencies
- Artistic expression
- Creative expression
- Development of fine motor skills
- Eye-hand coordination
- Number recognition
Materials
- Card stock or printer paper
- Crayons, pencil crayons or markers
Preparation
- Print out jersey templates
Implementation
- Provide each participant with a sports jersey template or blank printer paper, as well as an assortment of crayons, pencil crayons or markers
- Remind participants that a name and a 1- or 2-digit number (of their choice) should also be included on the jersey
Book Suggestions
5-Minute Basketball Stories by Sarah Howden
Basketballogy by Kevin Sylvester
Home Run, Touchdown, Basket, Goal! Sports Poems for Little Athletes by Leo Landry
My First Book of Lacrosse by Beth Bugler
Hayley Wickenheiser by Lorna Schultz Nicholson
What’s in a Number? by Meg Braithwaite
Download Links
Images
Sports Memory Game
Ages 3-5
20 minutes
Sports Memory Game
Description
A flip-the-card matching and memory game for young children
Space Considerations
Any type of space where caregivers can sit with their child and spread out the 12 cards
Competencies
- Memory
- Logic and sequencing
Materials
- Card stock or regular paper
- Printout of the memory card templates (colour is preferred)
Preparation
- Print the memory card templates and cut out each card
- For more durability, consider laminating the cards
Implementation
- Distribute the memory card templates to each caregiver to play with their child—For an easier game for very young children, omit one or two pairs of cards
- Caregiver shuffles the cards and places them picture-side down
- The child starts by flipping one card over
- The child then flips another card over
- If the two cards match, the child gets to keep the pair of cards and take another turn
- If the cards do not match, both cards are flipped back over (picture-side down) and the caregiver can take their turn
- The goal of the game is to collect as many pairs as possible
- Of course, trying to remember where specific cards were located is the key to the game!
Alternatively, preschoolers may be able to play each other, with adult assistance as needed.
Alternatively, preschoolers may be able to play each other, with adult assistance as needed.
Book Suggestions
When I Grow Up—Sports Heroes by DK Kids
Yoga Baby by Amy Hovey
Download Links
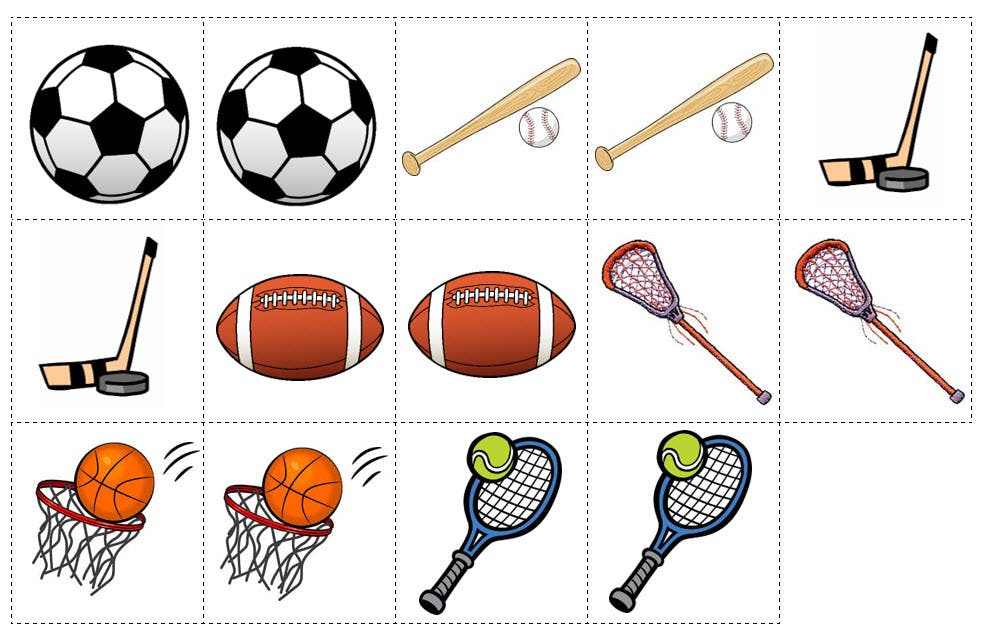
Images
Tangram Puzzle Art
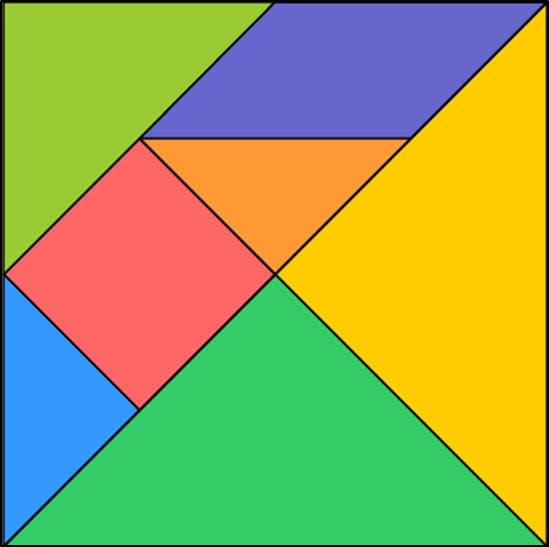
Ages 0-3
15 minutes
Tangram Puzzle Art
Description
Use tangram shapes to create a piece of unique art
Space Considerations
Any type of space where kids can be seated to do a craft
Competencies
- Artistic expression
- Creative and imaginative thinking
- Development of fine motor skills
- Organization and planning
- Spatial relationships
- Understanding shapes
Materials
- Tangram template printout
- Colour printer (optional)
- Coloured paper (optional)
- Crayons, pencil crayons or markers (optional)
- Glue
- Paper
- Scissors (adult use only)
Preparation
- Prepare the room for a program that uses glue
- Punch a hole in the top of the paper medal (or allow caregivers to punch the hole)
- Cut strips of the ribbon to a size that will fit over a child’s head (approximately 30 cm)
Implementation
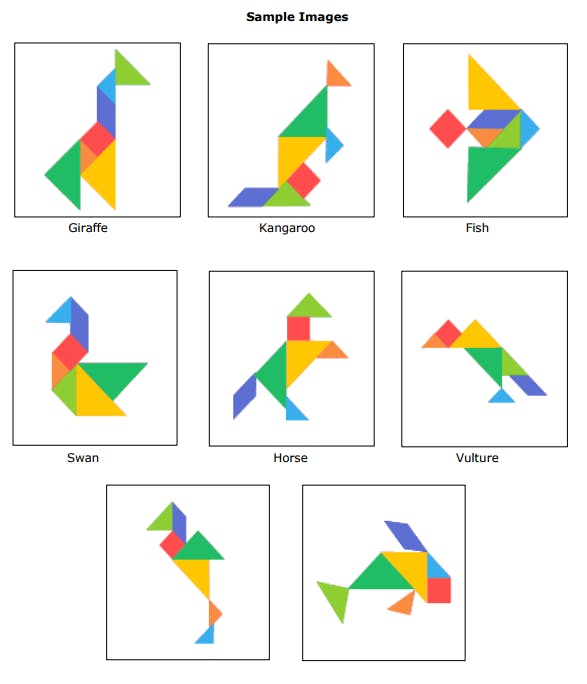
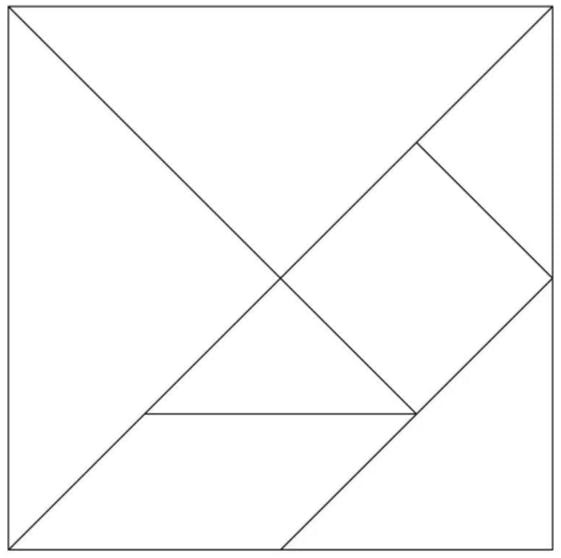
- Provide each participant with a full set of tangram shapes, glue and a piece of paper
- Participants use their shapes to create any image they choose (see sample images below) or abstract art
- There are over 1,600 different images that can be made using the tangram pieces!
Book Suggestions
Look and Find Animals by Kirsteen Robson
I Will Be Fierce by Bea Birdsong
Download Links
Images and Templates
Word Games
Ages 9-12
5-30 minutes
Word Games
Description
A collection of word games that can be used in a program or adapted for passive programming in your libraries
Space Considerations
Any type of space with seating for all players
Competencies
- Creative and imaginative thinking
- Logic and sequencing
- Working collaboratively
- Strategic thinking
Materials
- Pen or pencil
- Paper
- Timer or stopwatch (optional)
Implementation
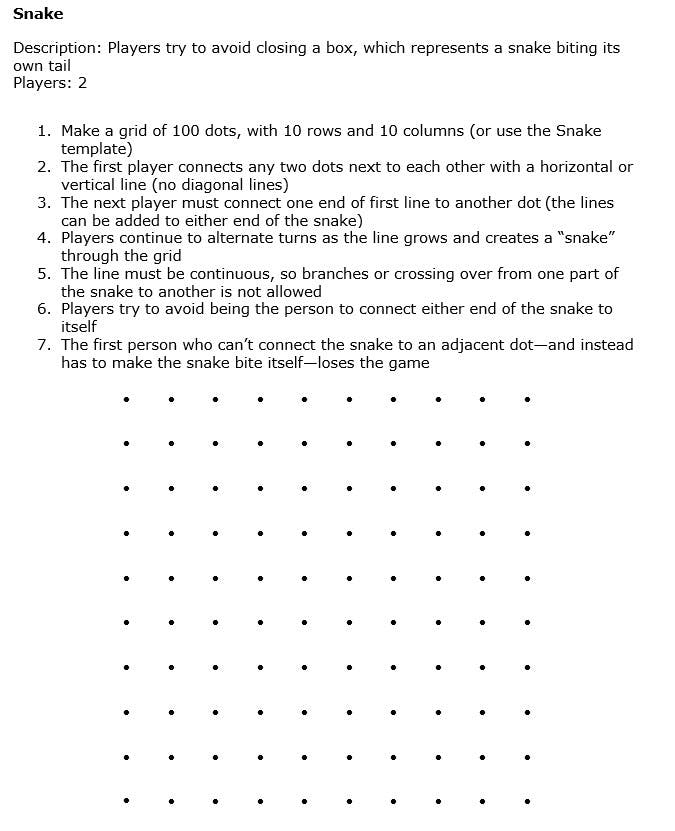
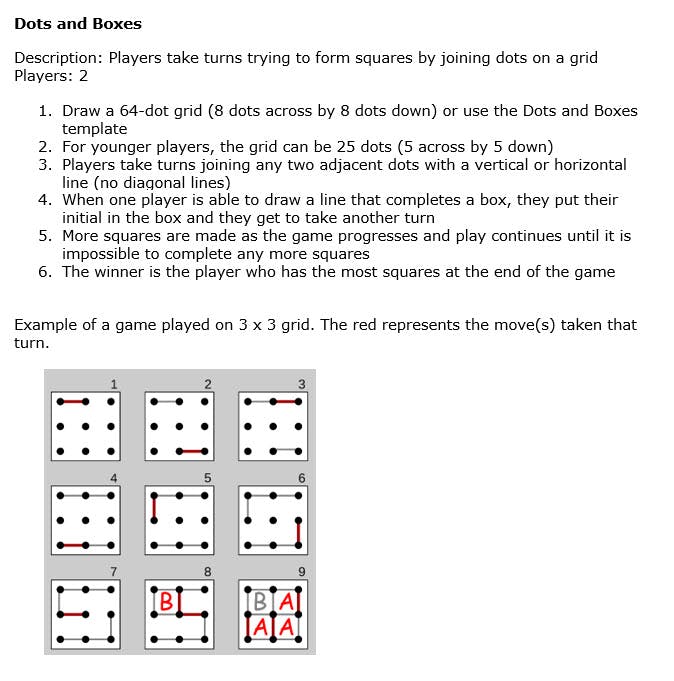
Select a word game from the list and modify as desired to fit your preferences and the number of participants in your program
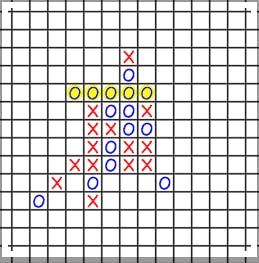
Word Grid
- Each player begins by drawing a four by four grid (16 squares total) on a piece of paper and hiding it from the other player(s)
- The players take turns calling out any letter—letters may be called more than once
- As each letter is called out, players must write the letter somewhere on the grid—you cannot erase it!
- The goal is to make as many four-letter words as possible
- When all of the grids are full (i.e. 16 letters have been called), players show their grids and count how many four-letter words they were able to create vertically, horizontally and diagonally
- The player with the most words wins that round
- Play as many rounds as desired
Triplet Challenge
- For each round, one player chooses any three letters, which each player writes down at the top of their sheet
- Within a two-minute time limit, the players write as many words as possible that include all three letters
- Players can use each letter as many times as they like
- Players are awarded one point for each word
- Play as many rounds as desired
Words Within Words
- For each round, choose any starting word with six letters or more
- Within a two-minute time limit, each player writes as many words as they can using letters from the starter word
- You can only use each letter in the starter word one time
- Proposed scoring:
• 1 point for words with 3 or fewer letters
• 2 points for words with 4 letters
• 3 points for words with 5 or more letters
Starting Lettters
- For each round, provide participants with three letters
- Participants use these three letters to start as many different words as possible within a 1-minute time limit
- Players are awarded one point for each word at the end of each round
- Play as many rounds as desired and then combine the scores from each round for a grand total
- Suggested starter letters: AND, BAT, CAR, DOT, ENT, FIL, GRO, HIL, INC, JUG, KNI, LAM, MOD, NON, OFF, PUM, QUI, RUN, SIT, TRI, ULT, VIR, WEL, YEA
Acrostics
- For each round, one participant should come up with a five-letter word
- All participants write that word vertically down the left side of their page
- Down the right side of the page, participants write the same word but with the letters in reverse order. For example: if the word is “teach”, each player writes T-E-A-C-H down the left side and H-C-A-E-T down the right side, ensuring the letters across the page are roughly in line, as pictured below
- The players now race to fill in the space between the two columns with words that begin with a letter on the left and end with the letter opposite it on the right
- The initial keyword cannot be used again
- The winner of each round could be:
• the fastest to complete the table, or
• the person who used the most letters overall (add up the total number of letters in all of their words)
Categories
- This game works best when played in groups of 3 to 6 participants
- Each player begins by drawing a grid on a piece of paper, with five boxes across and down, for a total of 25 boxes (the size of the grid can be modified as desired)
- Players select five categories that are broad enough for players to know plenty of examples of each (for example: colours, fish, animals, birds, boys’ names, girls’ names, cities, flowers, fruit, vegetables, countries, and song titles)
- Once the categories are selected, each is assigned a row in the grid and is written to the left side of that row
- Together, the players choose letters to put at the top of the grid’s five columns (all players use the same letters)
- Players try to complete the grid (Each box must be filled in with a word that fits into the category of its row and starts with the letter at the top of its column)
- Players have a set time period to complete the grid—5 minutes is recommended for a 5x5 grid
- When the time is up, the players take turns reading off their answers
• Any word that fits the category and the initial letter earns one point
• If no other participant came up with the same word, it gets another point (two points total)
• Blank boxes and words that don’t fit the category or the initial letter do not get a point - The high scorer at the end of the desired number of rounds wins
Book Suggestions
Andrew the Seeker by Lee Nordling
Camp Average by Craig Battle
Home Run, Touchdown, Basket, Goal! Sports Poems for Little Athletes by Leo Landry
Meet Tom Longboat by Elizabeth MacLeod
Download Links
Word Searches and Crosswords
Ages 6-8
20-30 minutes
Word Searches and Crosswords
Description
Complete Olympic-themed word searches and crosswords
Space Considerations
Any type of space with seating for participants
Competencies
- Problem solving
- Strategic thinking
- Eye-hand coordination
- Logic and sequencing
Materials
- Paper
- Pencils
Preparation
- Print activity sheets
Implementation
- Distribute activity sheets
- Provide pencils
Book Suggestions
Scholastic Year in Sports 2020 by James Buckley Jr.
Download Links
Images and Templates
Paralympic Games Word Search 1 + Solution